Types Of Emails
Trophy supports 4 types of emails, each of which is designed to suit a common scenario in building gamification experiences. All emails are optional, but all four can be used simultaneously and can be controlled from the Emails page in the Trophy dashboard.- Achievement emails are sent to users each time they unlock an Achievement.
- Recap emails are sent to users on a pre-defined frequency to summarize progress. Recap Emails can be configured to be sent daily, weekly, monthly or yearly depending on your use case.
- Reactivation emails are sent to users after they become inactive with the goal of bringing them back to your app.
- Streak emails are automatically sent to users reminding them to extend their Streak.
Sending Emails
To start sending emails with Trophy, you’ll need to verify your domain and add and activate email templates for the types you want to send.Domain Verification
Trophy supports sending emails from your own domain out-of-the-box. There are two ways to set this up, Single Sender Verification and DNS Verification. All domain settings can be found in the Domains page in the Trophy dashboard.Sender Verification
Quickly verify a single email address
DNS Verification
Recommended for production use
Sender Verification (Basic)
During onboarding you’ll be prompted to set up Sender Verification. This is a super simple way to quickly verify a single email address that you want to use with Trophy without needing to change any code or DNS settings. You’ll be prompted to enter the email address, from name and reply-to email that you’d like Trophy to use when sending emails: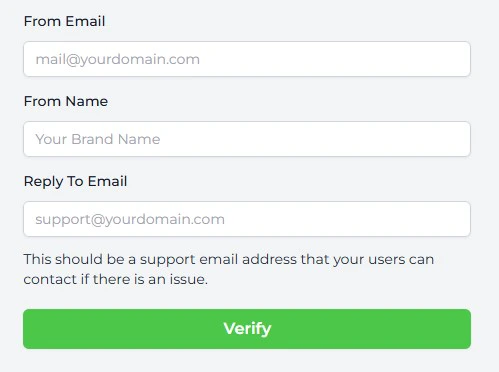
The email you receive will come from our email provider, Postmark. So keep an
eye out for ‘Postmark Support’ in your inbox!
DNS Verification (Advanced)
This feature is available on the Starter
plan.
Head to the Emails page
Within the Emails page, you’ll find the Domains tab which is where you’ll configure everything related to the email domain Trophy will use to send emails on your behalf.
Configure your domain
Head down to the DNS Verification section and enter the domain you want to set up with Trophy.You can also also configure a custom Return Path. This is where Trophy will forward notifications of bounced emails to help you investigate deliverability issues: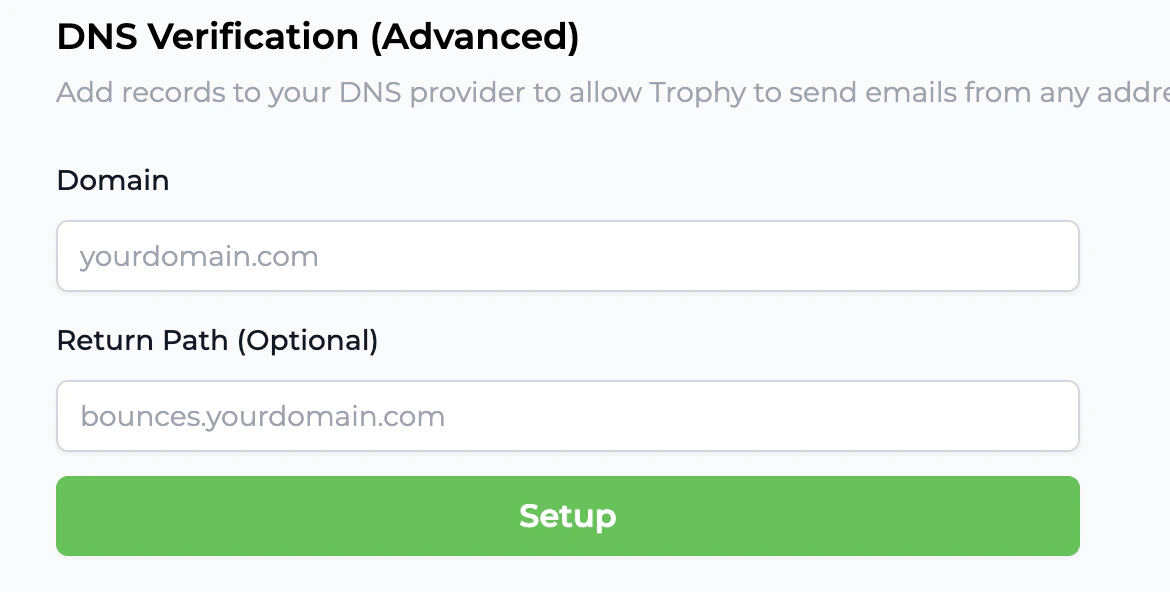
Set up your DNS records
Once you’ve entered your email domain, Trophy will provide you with details for two new DNS records that you’ll need to add to your DNS provider.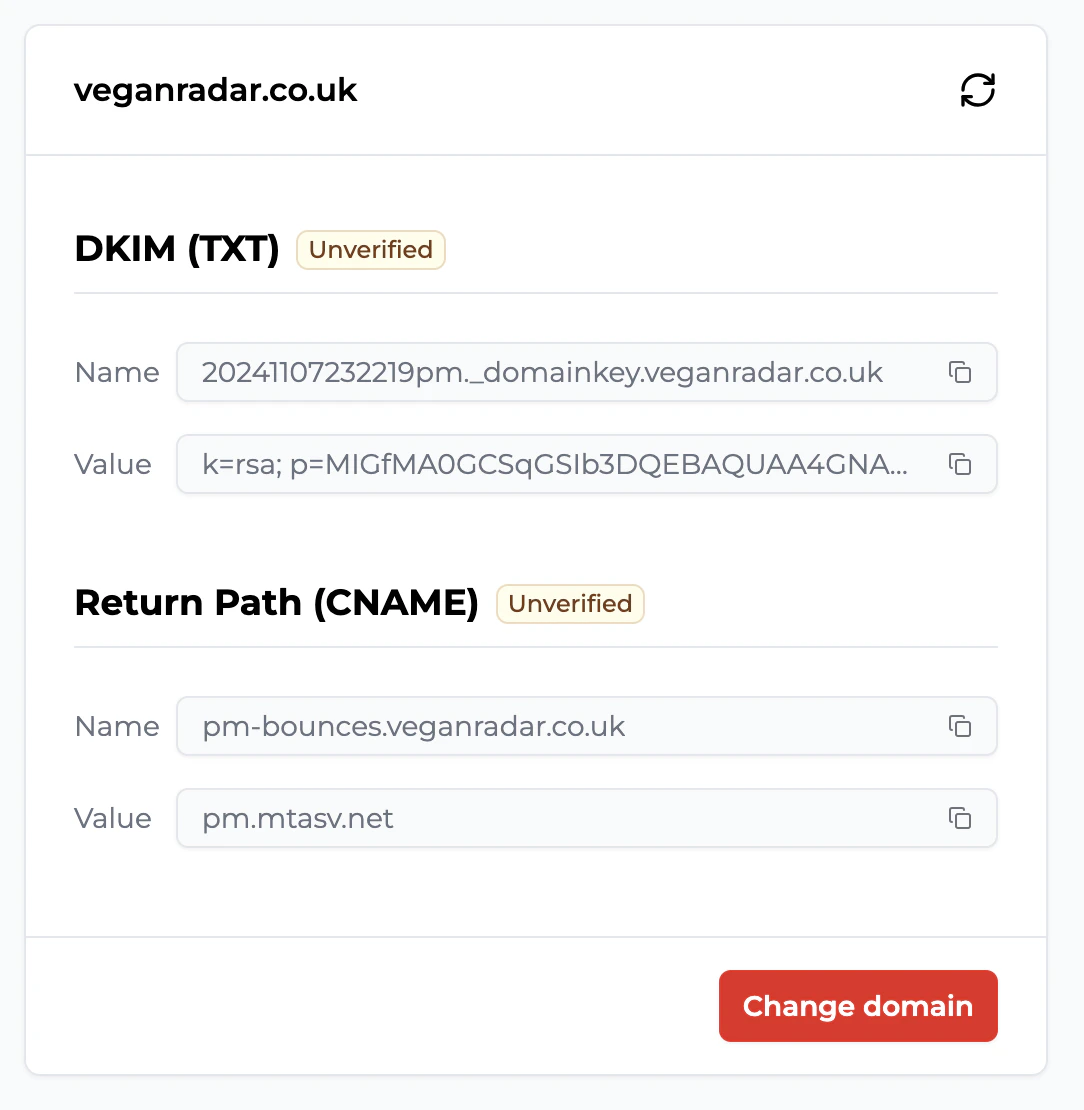
- First is the DKIM record which is used by inbox providers like Google to verify the authenticity of emails. Enter the name and value provided as a new TXT record in your DNS provider.
- Second is the Return Path record. This is used to forward notifications of email bounces to your domain. Enter the name and value provided as a new CNAME record in your DNS provider.
Cloudflare
Cloudflare
NameCheap
NameCheap
Verify DNS records
Once you’ve added the two records into your DNS settings, hit the refresh icon and Trophy will attempt to verify the records for you.Usually Trophy can verify records within a few minutes but bear in mind that DNS changes can take up to a few hours to fully propogate.If you see the following alert, the records may not have propogated yet, or there may be an issue with your setup.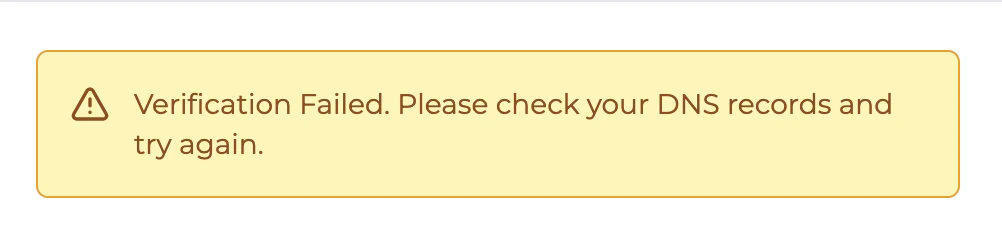 Once you’re sure everything’s set up correctly in your DNS provider, hit refresh and Trophy will attempt to verify your DNS records once again.As soon as you see the following message, you know everything’s verified:
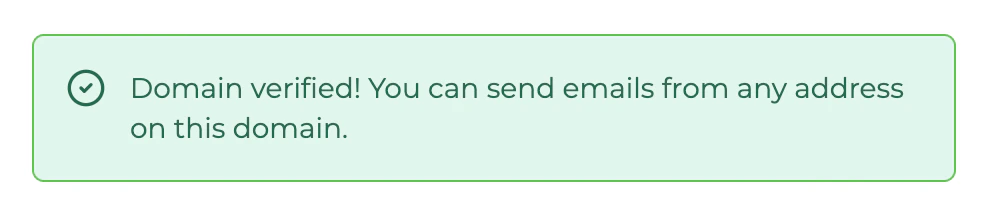
Configure your sending address
Once your DNS records are verified, it’s time to choose the email address you want to send emails from. Note that now you’ve fully verified your domain, you can change this address whenever you like without impacting deliverability.Simply enter the email address you want Trophy to send from, the name to show to users in the inbox when they receive emails and a support email address they can use to contact you if needed:
Email Triggers
On the email configuration page, each email type has its own section. Add templates under the relevant type and activate one to start sending.Recap Emails
Recap emails send weekly or monthly progress reports to users. You can change the frequency of these emails on the integration page using the Aggregation Period setting.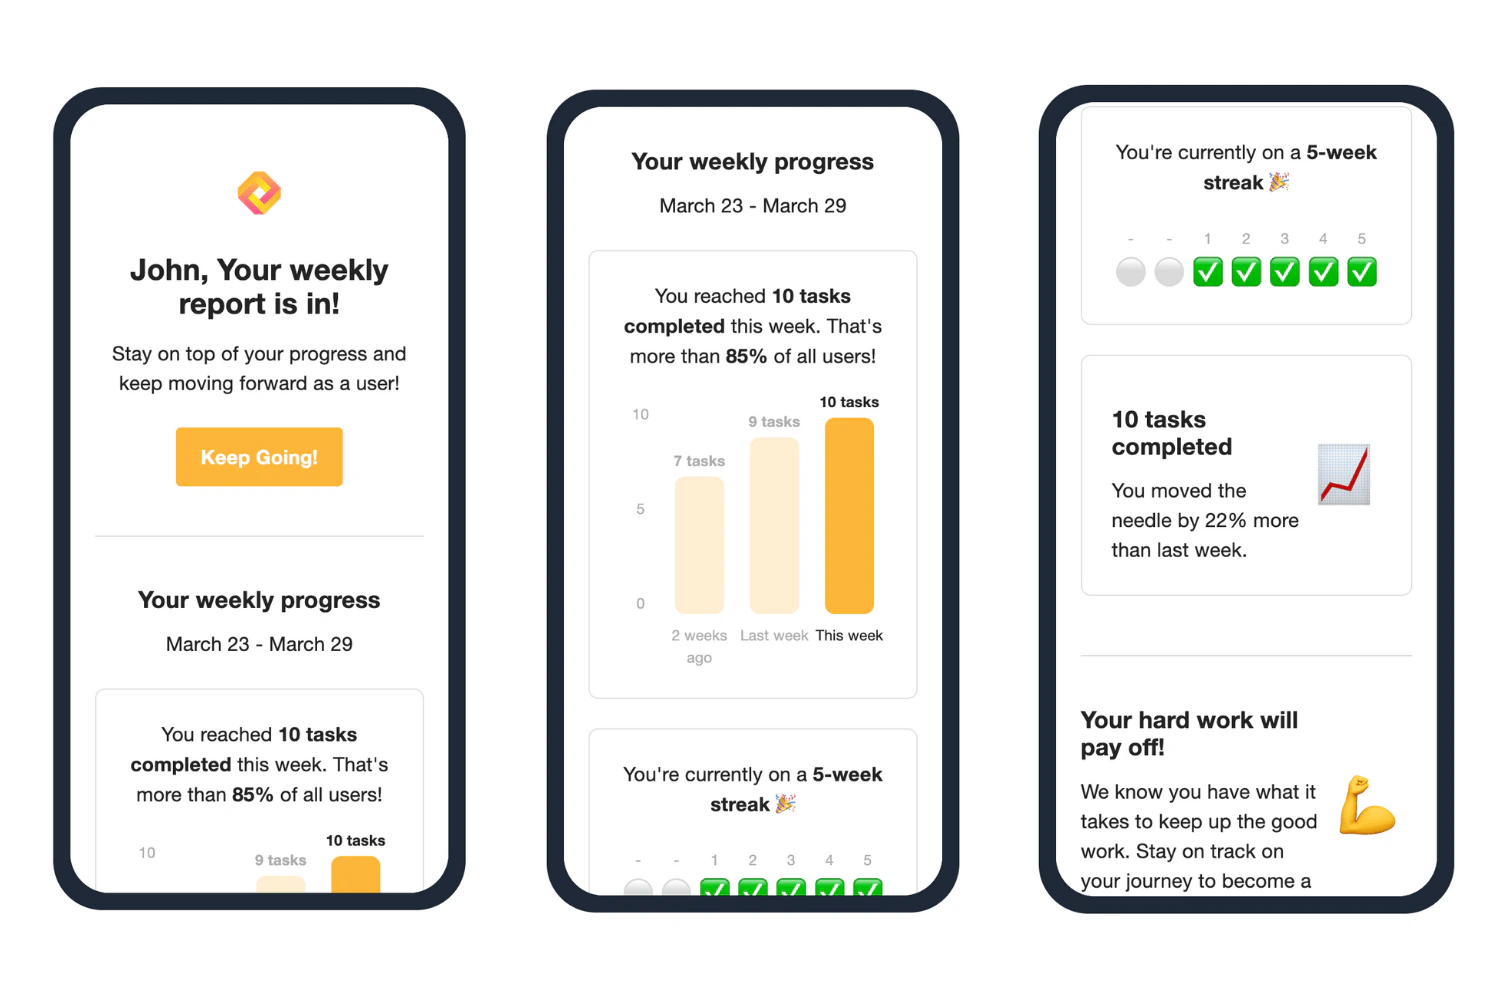
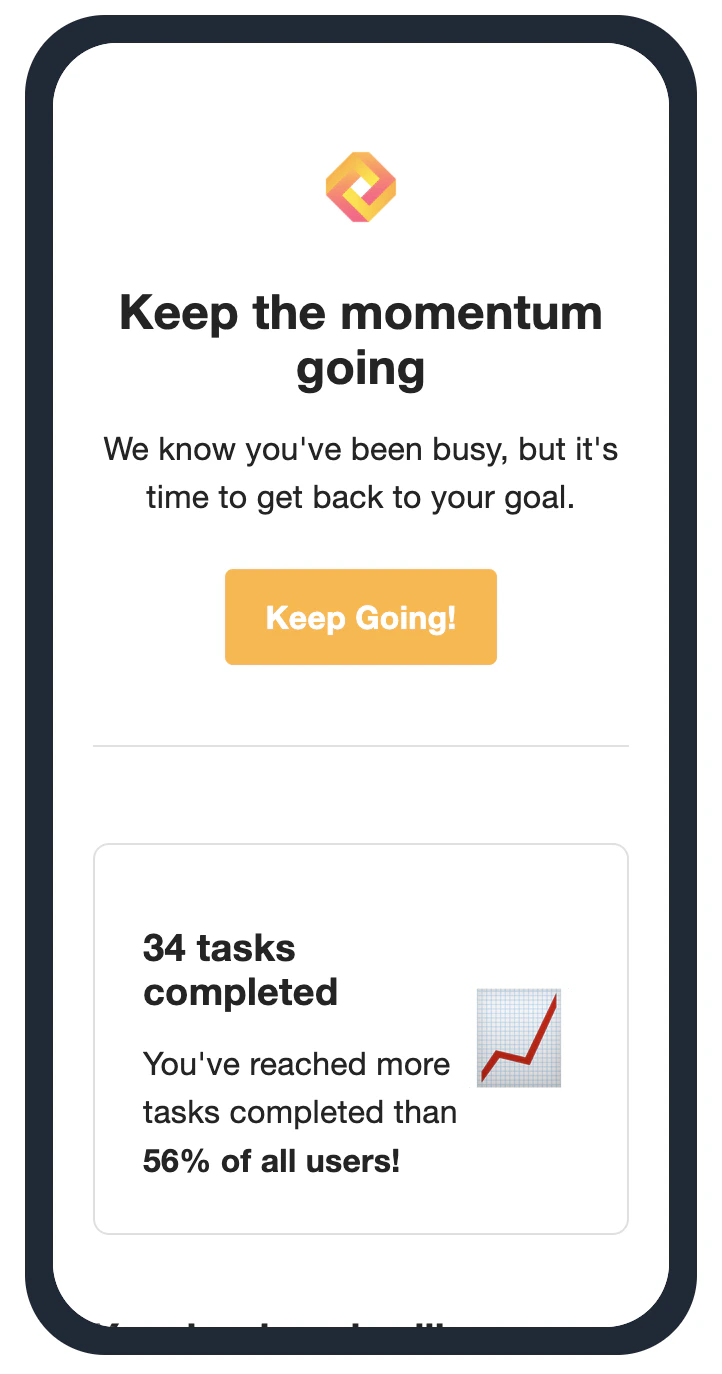
Reactivation Emails
Reactivation emails send win-back messages to users after they become inactive. These emails are sent according to the following timeline:- After 3 days of inactivity
- After 5 days of inactivity
- After 7 days of inactivity
- After 14 days of inactivity
- After 30 days of inactivity
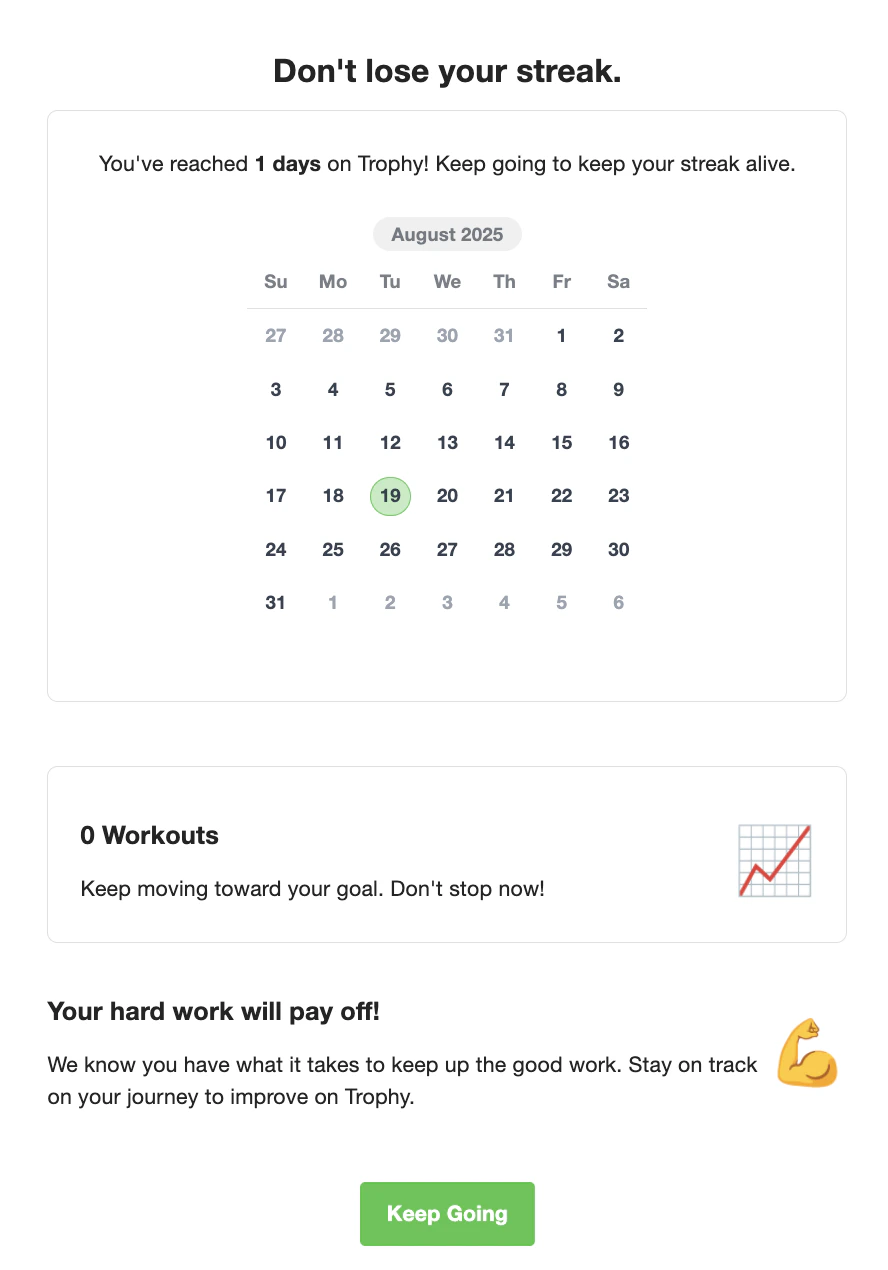
Streak Emails
Streak emails remind users to extend their streak before it expires. These emails are sent according to the streak frequency you configured on the streaks page:- If your app uses a daily streak, this email will send four hours before the end of the day (in each user’s timezone).
- For weekly streaks, it will send on Friday morning.
- For monthly streaks, it will send on the 25th of the month.
Achievement Emails
Achievement emails congratulate users when they complete an achievement you’ve configured in Trophy. These emails send between 5-9PM on the day the achievement is completed, or the next day at 5PM if it is past 9PM when the user completes the achievement.
Limiting Emails to Specific Types of Users
Each email template can be limited to users with specific custom user attribute values. For each attribute you’d like to restrict the email to, click the plus icon next to the User Filters header for the email template, then select the attribute and enter the desired value. Only users that have all specified attribute values will receive emails from this template.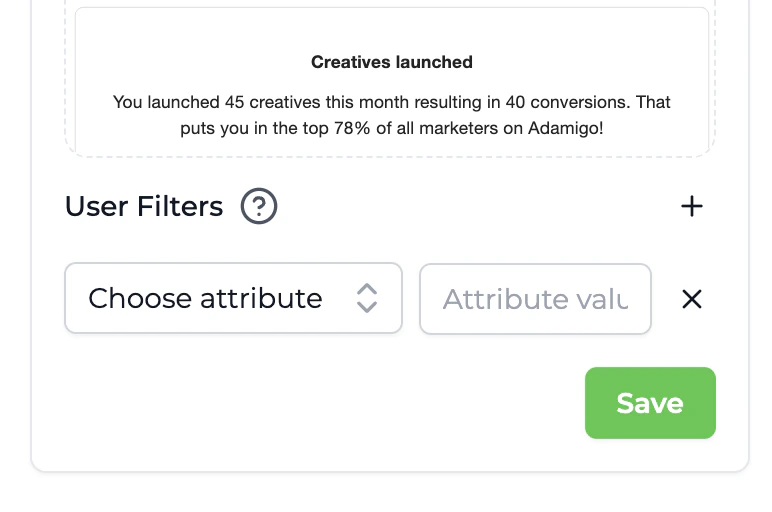
Time Zones
If you specify a timezone for each user through User Identification, Trophy will use that local time zone to schedule emails according to the logic specified above. If you do not provide time zones for the users you identify, Trophy will default to Eastern Time.Designing Emails
Trophy has a fully-featured block-based email builder that allows you to design templates, controlling all email copy and subject lines. On the emails page, add templates under each email type section you want to use.Default Templates
By default, Trophy provides a template for each email type as a good starting point. The default templates can’t be changed, but you can duplicate and customize these as you wish.Creating A New Template
To create a new email template, follow the steps below.Head to the Emails page
Within the Emails page, you’ll find the
Configure tab, where each email type section contains its templates.
Add a template
Click the Add Template button within the section for the email type you want to create a template for.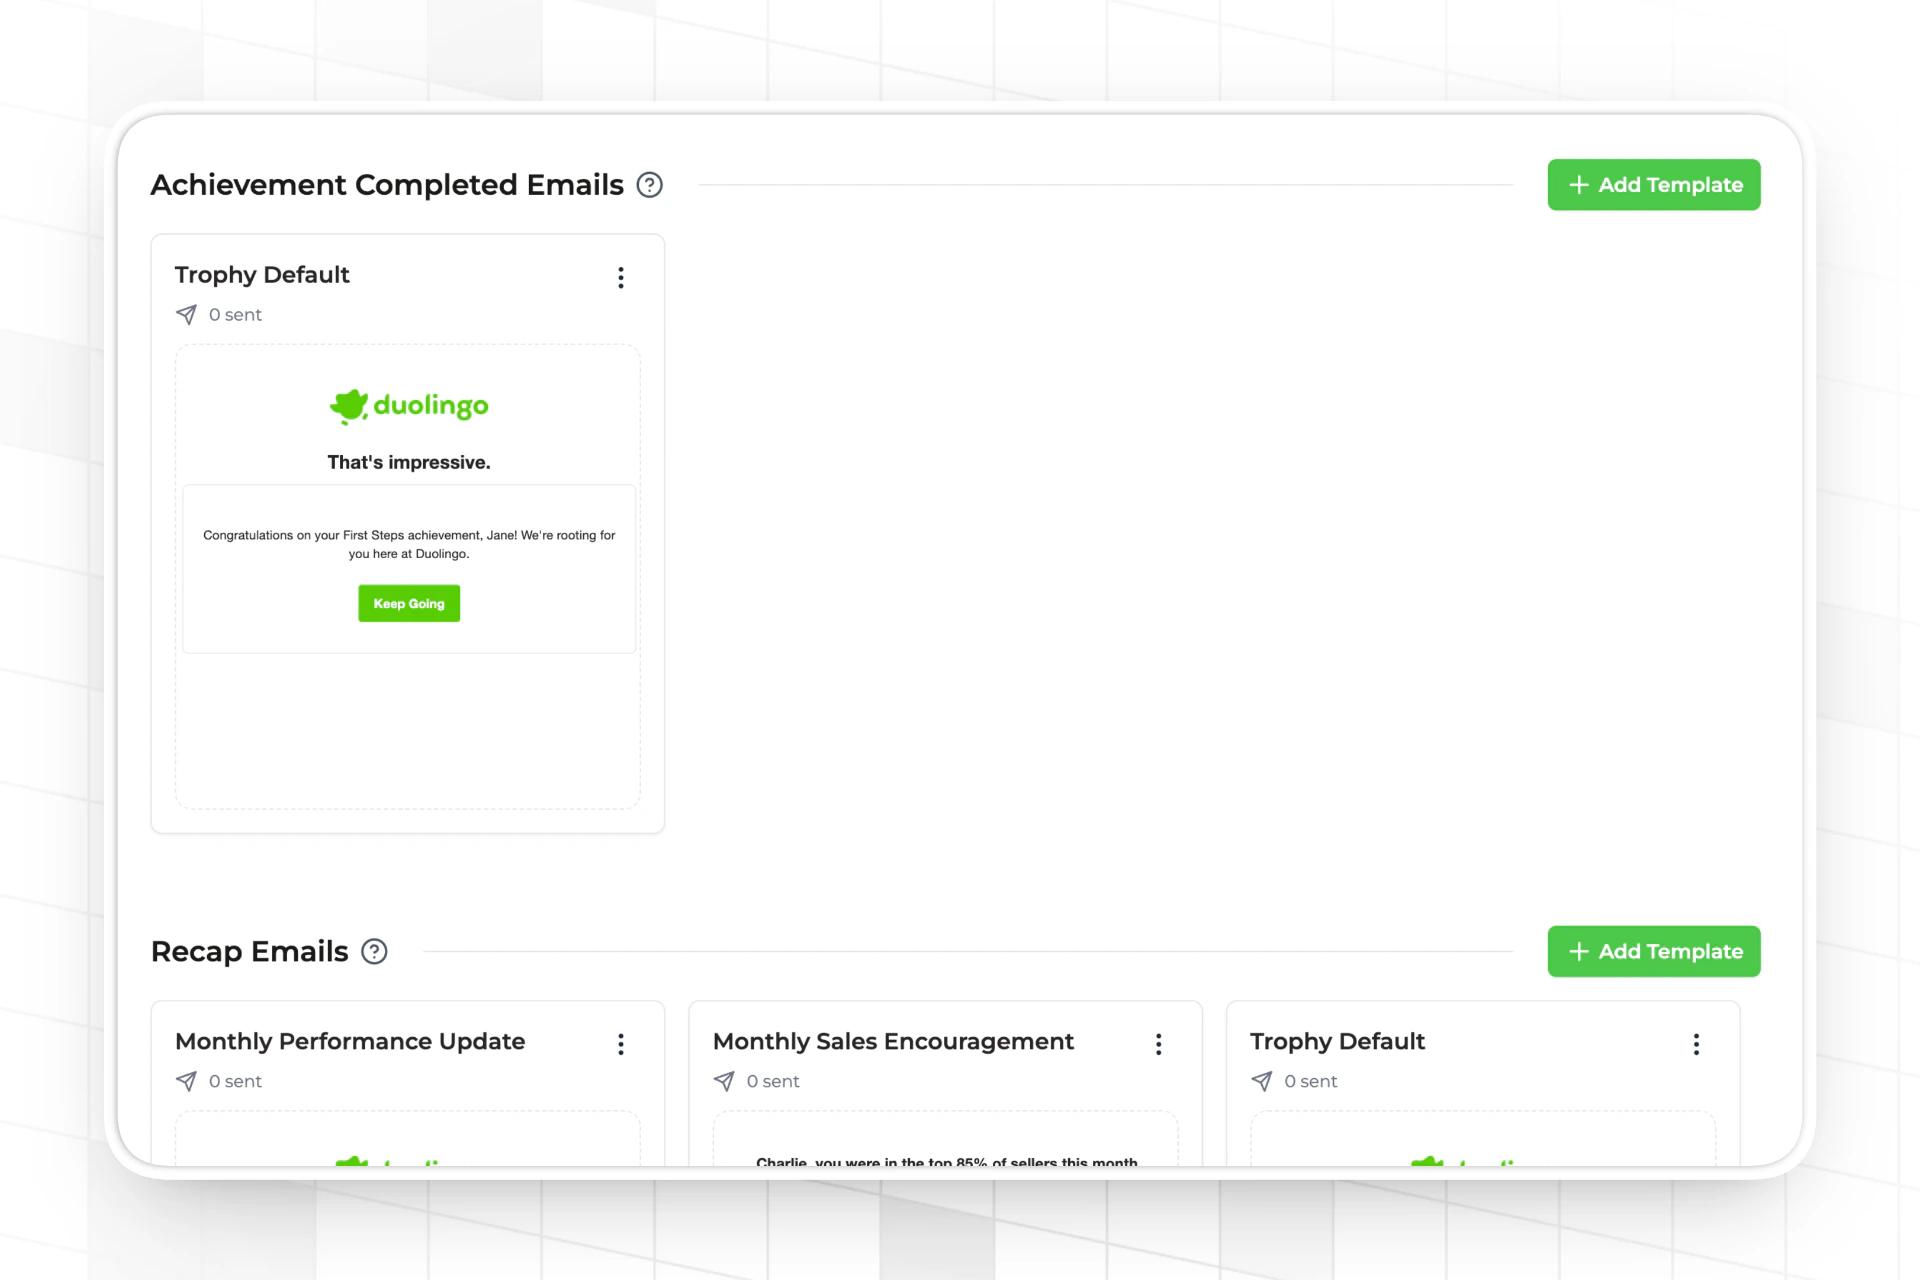
Block Types
Trophy’s email builder supports a number of different block types that serve different purposes. All the basic components you’d expect to find in an email editor like paragraphs, headers, and images are called Basic Blocks. There is also a set of more powerful components like charts and streaks that leverage Trophy’s user activity data and gamification features. These are called Smart Blocks.
Basic Blocks
Here’s the full list of un-opinionated basic blocks that Trophy supports:- Paragraph - Good for short or longer text snippets.
- H1, H2, H3 - Useful for headings of varying sizes.
- Button - Creates a call to action for users to take in emails.
- Card - Can nest other blocks, focusing attention.
- Divider - Good for separating content into logical sections.
- Emoji - Include any supported emoji, controlling size.
- Image - Upload any image and Trophy will render it in emails.
- Spacer - Good for giving blocks room to stand out.
- Columns - Useful for creating up to 3-column layouts with any content.
- Logo - Will render your organization’s logo, set on the Branding page.
Conditional Blocks
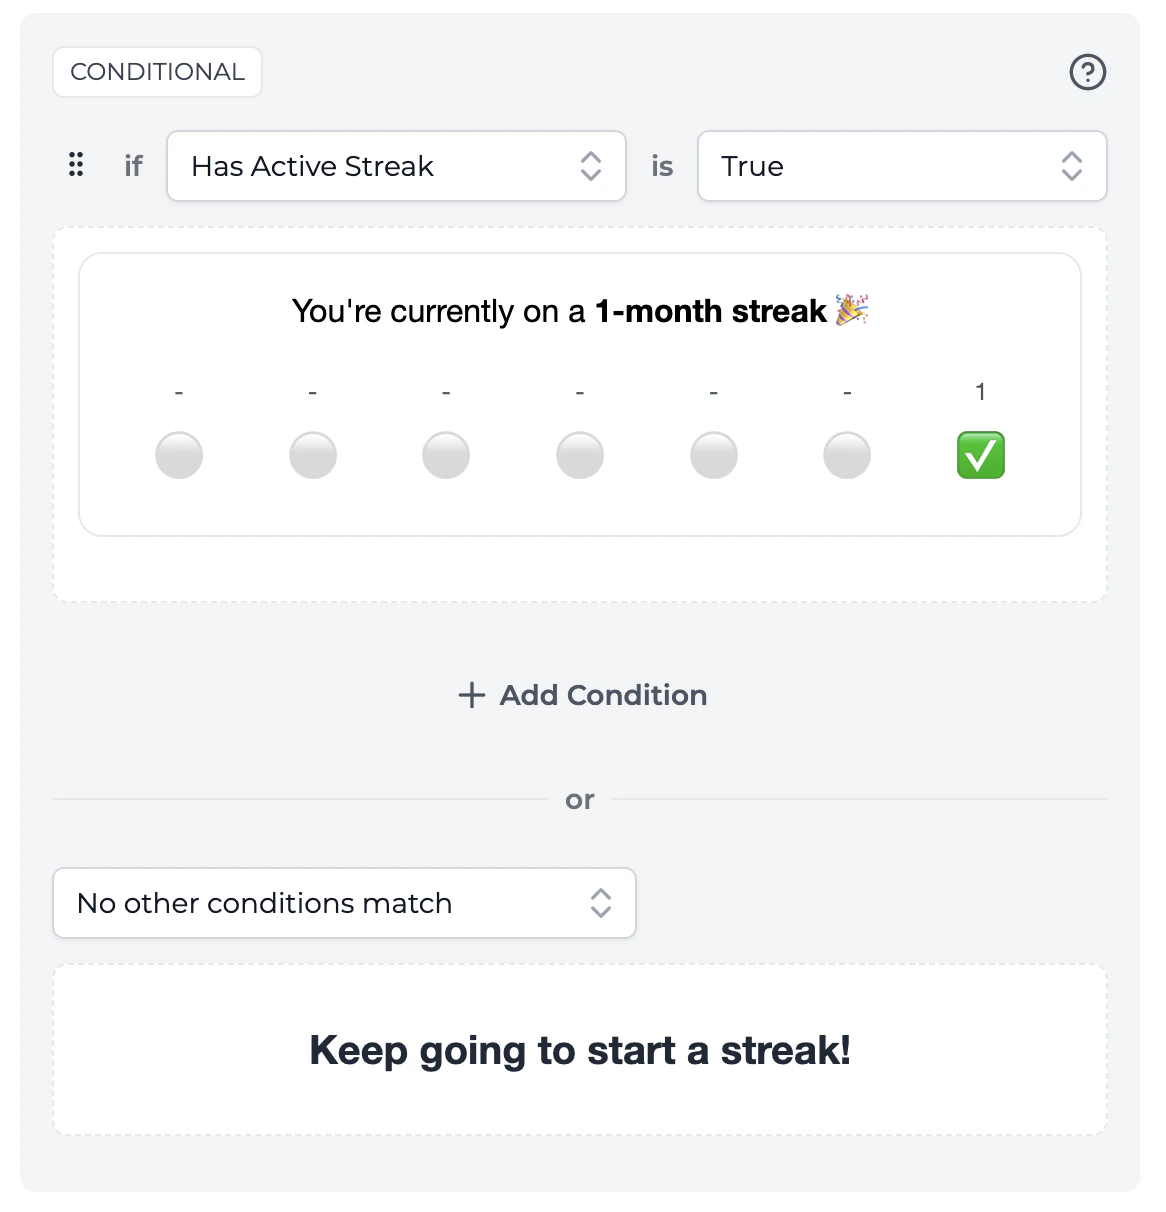
Trophy also has a powerful conditional rendering system powered by the Conditional block type. By nesting any other block inside a conditional block and setting up the conditions logic, you can create almost any email design that will show different blocks in emails based on the evaluation of conditions at send time. If you’re familiar with theif/else logical operators then this will feel very familiar to you. Otherwise here’s a quick diagram to explain how it works.
One common use case for the conditional block is to conditionally show a user their streak (one of Trophy’s built-in Smart Blocks) and some streak-related motivational text only if they have an active streak. If the recipient isn’t on a streak at the time the email is sent, then a simple message is displayed instead.
Smart Blocks
Smart blocks are powerful components designed to support common gamification use cases and integrate with all of Trophy’s features including metrics, achievements and streaks. You can find all smart blocks in the Recommended Blocks section, and they are always recognizable by the icon. Watch Charlie walk through smart blocks and how they work:Achievement Progress Chart
Achievement Progress Chart
The achievement progress chart block displays a chart with bars for up to five achievements for a particular metric, highlighting any that the recipient has unlocked.Choose the metric to display achievements for using the metric selector.
Achievements Unlocked
Achievements Unlocked
The achievements unlocked block displays the achievement the recipient has unlocked. This is only useful in the context of achievement unlocked emails. If the recipient hasn’t unlocked any achievements, then this block won’t show in emails.Where achievements have badges, these will be automatically shown, as well as the name of the achievement.
Progress Chart
Progress Chart
The progress chart block shows the recipient’s progress against a particular metric over the last 3 aggregation periods.
Streak
Streak
The streak block displays the recipient’s current streak according to your account’s streak settings.For daily streaks, a calendar block is shown displaying the last month’s streak history. Weekly and monthly streaks display the last 7 periods of streak history.
Email Variables
Trophy provides an expansive set of email variables that can be used to insert highly relevant and personalized copy into the body of emails and subject lines. Variables bring context from your Trophy account, the recipient’s progress data, and email specific settings to your email templates. Email variables can be inserted by typing@ in any block that supports rich text, like headers, paragraphs, and buttons, and searching for your chosen variable.
This will open up the variable editor window where you can configure variables as in the demo below.
User
User
Variables related to the recipient of the email.
- Name: The recipient’s name, if set
Metrics
Metrics
Variables related to the recipients tracked event data against metrics.Each Trophy metric supports the following email variables:
- Metric Name: The name of the metric
- Metric Units: The metric’s units
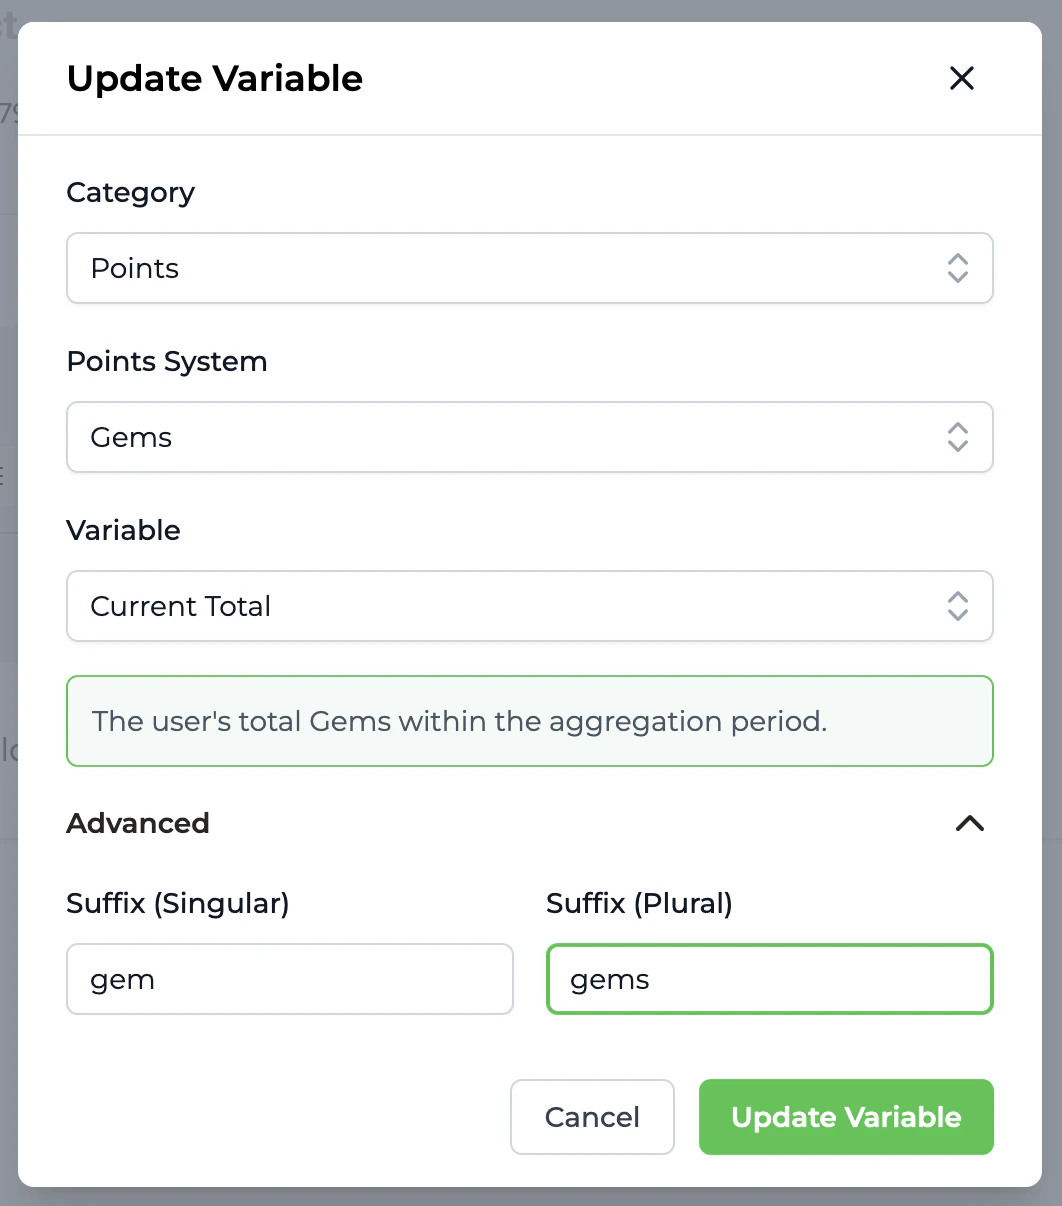
- Current Total: The sum of all the recipients event values to date
- Change This Period: Absolute change in the recipients current total in the current aggregation period
- Change This Period (%): Percent change in the recipients current total in the current aggregation period
- Percentile (All Time): The recipients current total compared to all other users for all time
- Percentile (This Period): The recipients current total compared to all other users in the current aggregation period
Points
Points
Similarly to metrics, each points system has the following variables that can be used to add dynamic data to email copy:
- Current Total: The recipients total points
- Change This Period: Absolute change in the recipients total points in the current aggregation period
- Change This Period (%): Percent change in the recipients total points in the current aggregation period
- Percentile (All Time): The recipients total points compared to all other users for all time
- Percentile (This Period): The recipients total points compared to all other users in the current aggregation period
Achievements
Achievements
These variables are only relevant for achievement emails.
- Is Final Achievement: If the achievement triggering the email is part of a series of metric achievements, this is true when the achievement is the final achievement in the series
- Percent To Next Achievement: If the achievement triggering the email is part of a series of metric achievements, this is the percentage until the user unlocks the next achievement in the series
- Achievement Name: The name of the achievement that triggered the email
- Achievement Description: The description of the achievement that triggered the email
Streak
Streak
Variables related to the recipient’s streak.
- Has Active Streak: True if the recipient has an active streak at the time the email is sent, false otherwise
- Streak Length: The length of the recipient’s current streak
- Streak Extended: True if the recipient’s streak was extended, false otherwise
- Days Since Last Extended: The number of days since the user last extended their streak
Reactivation
Reactivation
These variables are only relevant for reactivation emails.
- Message Number: The number of the message in the reactivation sequence (1-5)
Aggregation Period
Aggregation Period
These variables are only relevant for recap emails.
- Current Period Date Range: The start and end dates of the current aggregation period
Advanced Usage
There are a couple of additional options to consider when using emails variables. Prefix & Suffix You can provide a prefix and suffix for text variables like the recipients name, or the name of a particular metric.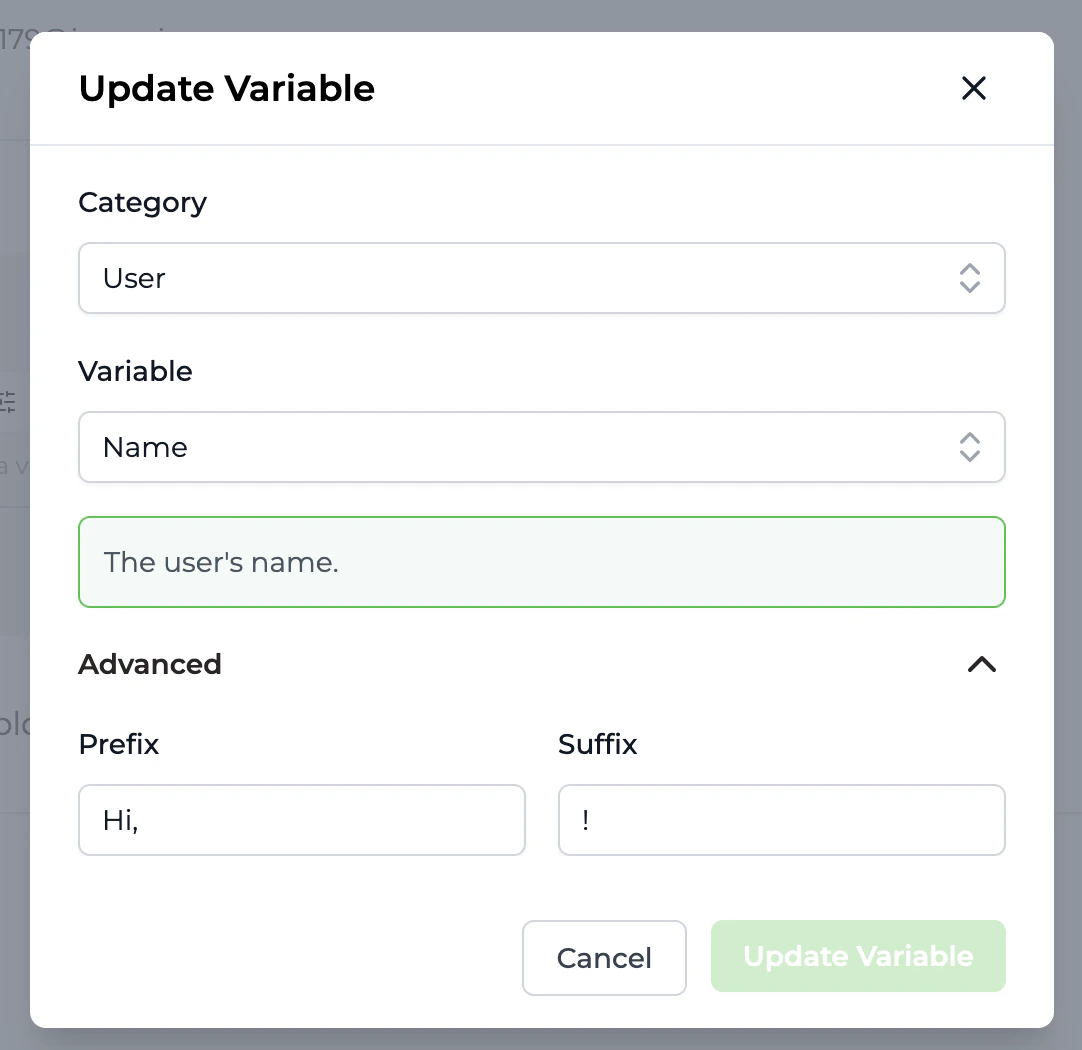
Text Variations
Variations can be used to add randomness to text within emails sent by Trophy. This prevents emails from getting boring and helps improve open and click rates.Variations do not support A/B testing yet, but this is on our roadmap so stay
tuned…
Using The Editor
The email template editor is a blank canvas for designing emails that look great in the inbox. Using pre-configured Blocks makes it really easy to create email templates that suit common gamification use cases. Here we’ll walk through how to best use the editor to create awesome looking emails.Adding Blocks
To add a new block an email template hit the key, this will open the block selection dialog where you can choose the block you want to add.Arranging Blocks
Blocks can be dragged up and down using the block menu.Text Formatting
The email editor offers rich text formatting including bold, italics, hyperlinks andcode formatting.
Font Style
On the email configure page, you’ll find a setting to change the font style used in all emails.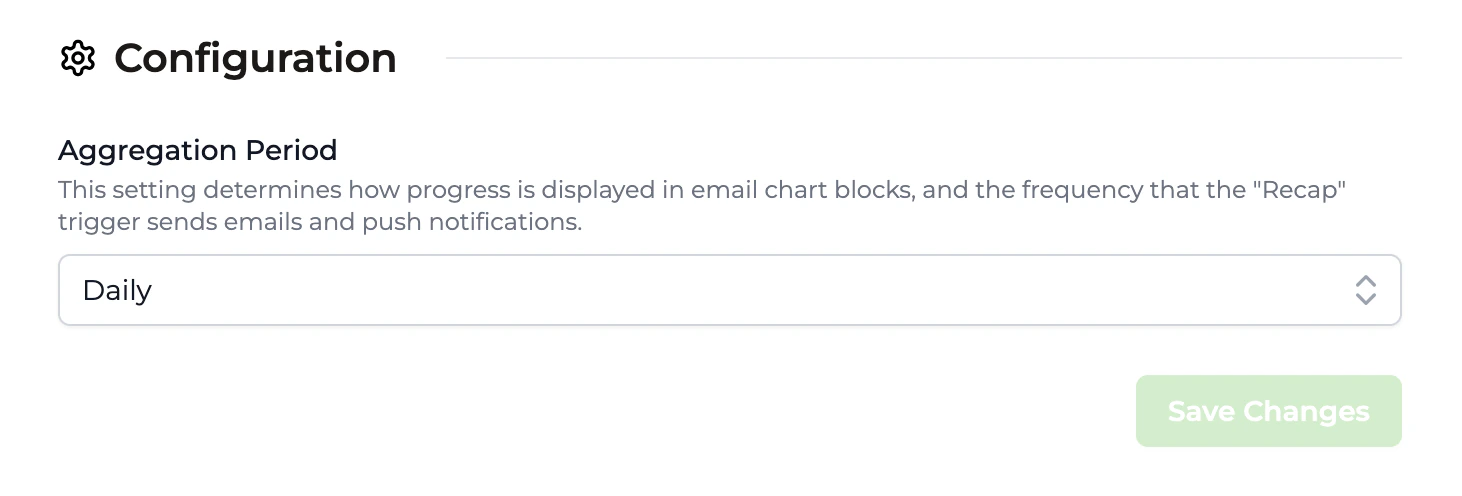
Handling Unsubscribes
All emails that Trophy sends include an unsubscribe link and message. This is important for maintaining compliance with regulations and it’s not possible to hide it.The message will read as follows: You are receiving this email because you
are subscribed to progress report and achievement emails. If you no longer
wish to receive these emails, you can unsubscribe.
Email Analytics
Trophy has built-in analytics for all Emails that it sends. This includes:- Recipients (The total number of people that received the email)
- Open rate (The percentage of recipients that opened the email)
- Click rate (The percentage of recipients that clicked on at least one link in the email)
- Retention rate (The percentage of users that opened the email that came back and used your platform after at least 2 days)
Frequently Asked Questions
Can I send emails from my own domain?
Can I send emails from my own domain?
Yes! Sending emails from your own domain is supported out-of-the-box. Follow the steps in the section on sending emails to get started.
Do you limit how many emails I can send?
Do you limit how many emails I can send?
No, we don’t limit how many emails you can send. However, we do monitor usage
to prevent abuse.