

 MCP
MCPTable of Contents
- Tech Stack
- Pre-requisites
- Setup & Installation
- Building the Flashcards Feature
- Adding Basic Gamification
- Adding an XP System
- Adding Leaderboards
- Adding an Energy System
- The Result
Tech Stack
- NextJS 15 (React 19)
- Shadcn/Ui
- Lucide for iconography
- Motion for animations
- HTML5 Audio API for sound effects
- Trophy for gamification
Pre-requisites
- A Trophy account (don’t worry we’ll set this up as we go along…)
Setup & Installation
First we need to create a new NextJS project:npm:
--force but you should choose whichever setting you feel suits your requirements.
Building the Flashcards Feature
Setting Up Flashcard Data
For the purposes of this tutorial, we’re going to be using some simple types with an in-memory data store. In a production application you’d probably want to consider storing this information in a database. Here we’ll have a very simple type that stores information about each flashcard where we’ll use thefront property to store questions that the student wants to learn the answer to, and the back property to store the answers to each question:
src/types/flashcard.ts
src/data.ts
Basic Flashcard Layout
With some basic data set up, we need to add a way for users to flick through their flashcards. For this we’ll use thecarousel and card components from shadcn/ui so we need to add these to our project:
<Flashcards /> component that combines these into a working solution, specifying that we can pass along any list of IFlashcard objects as props
src/app/flashcards.tsx
page.tsx file to display our <Flashcards /> component, passing in our example flashcard data:
src/app/page.tsx
Flipping Flashcards
Now this is great, but it’s not much use as a study app right now as there’s no way to see if you got the answer right! We need to add a way to flip flashcards over and check our answer… To make this simpler, we’ll first create a<Flashcard /> component that will be responsible for all the logic for each flashcard:
src/app/flashcard.tsx
<Flashcards /> component to instead just render out a list of the individual <Flashcard /> components:
src/app/flashcards.tsx
- First, we’ll add a
sidestate variable that will hold the current side of the flashcard that’s showing. - Next, we’ll add an
onClick()callback to the<Card />component that will update thesidestate tobackwhen clicked if the front of the card is currently showing. - Finally, we’ll conditional render the text in the
<Card />based on the value of thesidestate variable.
src/app/flashcard.tsx
<motion.div /> with a light spring animation in the y-axis to create the effect:
src/app/flashcard.tsx
- Ensure that when a
<Card />is flipping, the ‘back face’ isn’t visible during the animation withbackface-visibility: hidden; - As the
<Card />component is a child of the<motion.div />, usually it would appear flat when it’s parent rotates in 3D. Addingtransform-style: preserve-3d;to the<Card />ensures it keeps it’s 3D effect when it’s parent animates.
src/app/flashcard.module.css
A Flippin’ Bug!
Sweet! Our project is now starting to feel like a real study tool! However the keen eyed (or maybe not so keen…) will notice there’s one major bug here. When we flip a card over, the answer on the back appears in reverse 😢…motion to literally flip over our card in the Y-axis, we need to make sure we write our answers backwards as well.
First, we’ll add a little CSS snippet to handle writing text backwards:
src/app/flascard.module.css
src/app/flashcard.tsx
Tracking Progress
The next step is to add some UI to show the user how many flashcards they’ve looked at, and how many in the set they have left. We’ll use a simple progress bar to achieve this. Before we can start tracking this level of information, we need to set up tracking for a new state variable that holds the index of the flashcard the user is currently looking at. We’ll use the carousel api to hook into the functionality here and keep our state variable up to date:src/app/flashcards.tsx
progress component from shadcn/ui to our project:
Adding Basic Gamification
In this section we’ll be adding the following gamification elements to the flashcard project:- Achievements for completing:
- 10 flashcards
- 50 flashcards
- 100 flashcards
- 250 flashcards
- Daily streak for completing at least one flashcard a day.
- Automated emails for:
- Achievement unlocked
- Weekly progress summaries
How Trophy Works
First off, we need a new Trophy account. Then we can start to piece together the various parts of our gamification experience. In Trophy, Metrics represent different interactions users can make and can drive features like Achievements, Streaks and Emails. In Trophy we track user interactions by sending Events from our code to Trophy against a specific metric. When events are recorded for a specific user, any achievements linked to the specified metric will be unlocked if the requirements are met, daily streaks will be automatically calculated and kept up to date, points are awarded, and leaderboards are updated. This is what makes building gamified experiences with Trophy so easy, is does all the work for you behind the scenes. Recording an event against a metric for a specific user makes use of Trophy’s metric event API, which in practice looks like this:Setting Up Trophy
Here’s how we’ll setup our Trophy account for our study app:- First, we’ll set up a Flashcards Flipped metric
- Next, we’ll setup achievements linked to this metric
- Then, we’ll configure a daily streak linked to this metric
- Finally, we’ll configure automated email sequences for this metric
Create the metric
Create the metric
Head into the Trophy metrics page and create a new metric, making sure to specify
flashcards-flipped as the metric key. This is what we’ll use to reference the metric in our code when sending events.Create achievements
Create achievements
Next, create one achievement for each of the following milestones: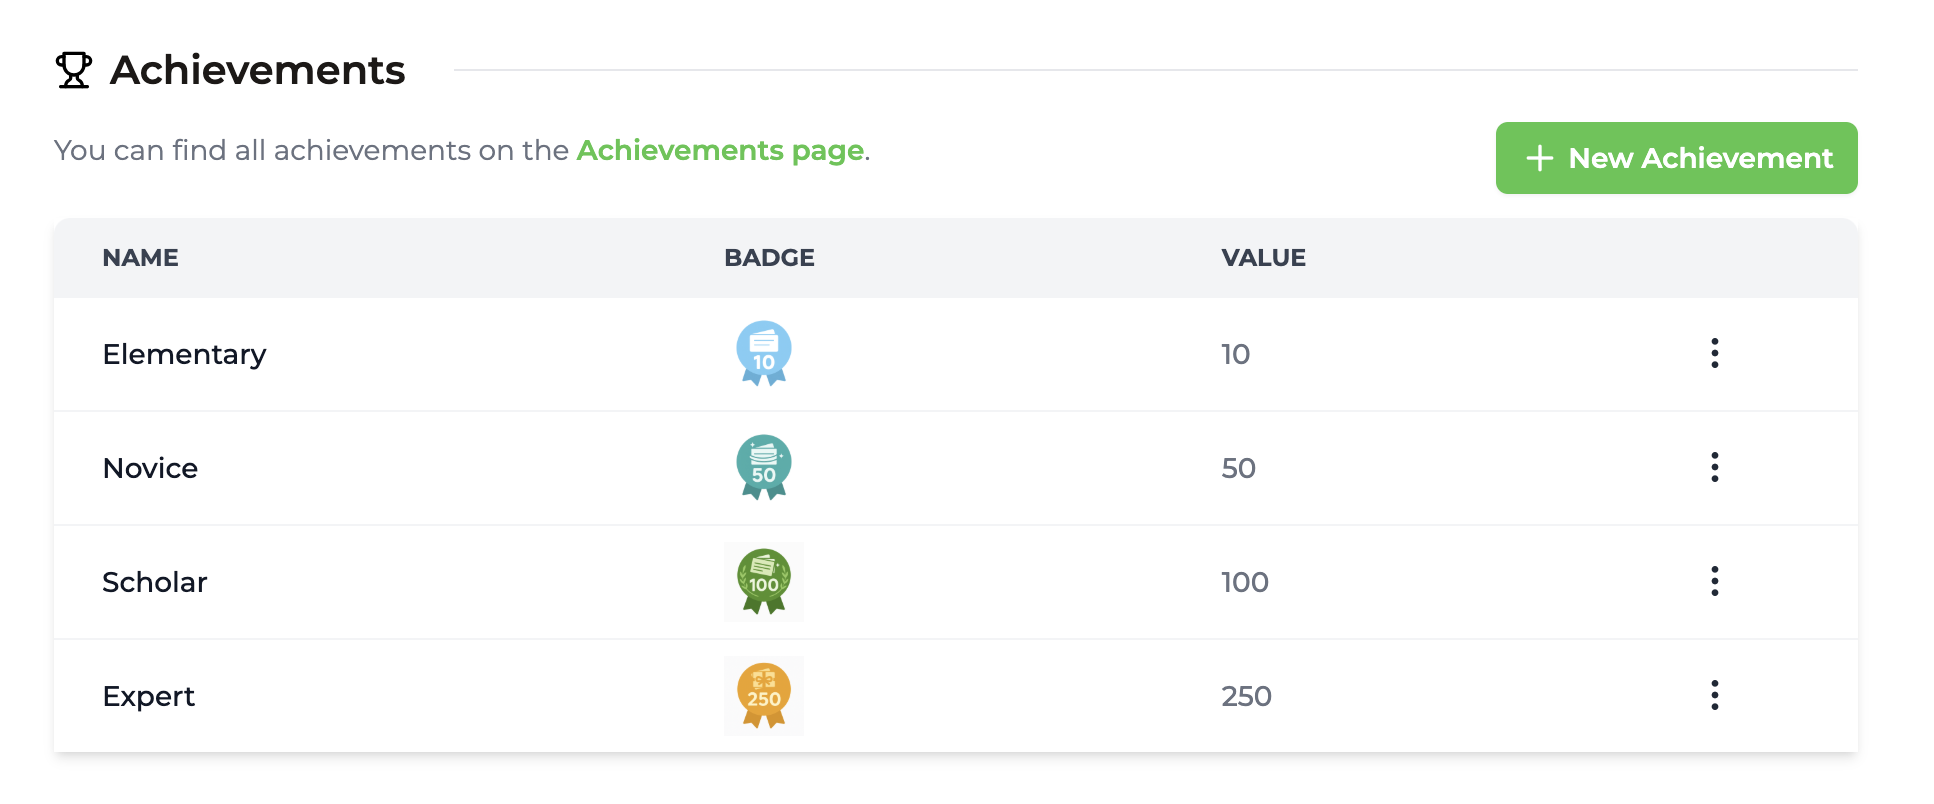
- 10 flashcards (Elementary)
- 50 flashcards (Novice)
- 100 flashcards (Scholar)
- 250 flashcards (Expert)
Configure daily streak
Configure daily streak
Next, head into the streaks page and set up a daily streak.
Configure emails
Configure emails
Head into the emails page and add and activate templates for the two types of emails we want.
- Achievement unlocked emails
- Recap emails (weekly)
Before you can start sending emails, you’ll need to configure your sending
address with Trophy. But this can be done
later on if preferred.
Integrating Trophy SDK
First we need to grab our API key from the Trophy integration page and add this as a server-side only environment variable..env.local
src/app/actions.ts
src/app/flashcards.tsx

Adding Gamification UX
The response to the API call that we make to track events in Trophy helpfully gives us back any changes to the users progress as a result of that event:Response
- The
achievementsarray which is a list of newly unlocked achievements as a result of the event. - The
currentStreakobject which is the users most up to date streak data after the event has taken place.
- Show a pop-up toast
- Play a sound effect
Achievement Unlocked Toasts
First, we’ll show a toast when users unlock new achievements. For this we need to add thesonner component from shadcn/ui to our project:
<Toast /> UI component we need to display toasts and a toast() utility function to trigger them:
src/lib/toast.tsx
page.tsx file with the main <Toaster /> component. This is the component from sonner which is responsible for displaying our toasts on the screen when we trigger them:
src/app/page.tsx
<img> and skip remote patterns.
next.config.ts
<Flashcards /> component to read the response from Trophy and display toasts for any unlocked achievements:
src/app/flashcards.tsx
Streak Extended Toasts
We’ll use the same methods to show similar toasts when a user extends their streak. As we’ve set up a daily streak in Trophy, this will trigger the first time a user views a flashcard each day. All we need to do is read thecurrentStreak.extended property from Trophy and handle showing another toast with a new if statement:
src/app/flashcards.tsx
Sound Effects
Gamification is first and foremost about increasing user retention. The best way to do this is to make the features we build as engaging as possible. A great way to do this that’s often overlooked is with sound effects. Here we’ll add two distinct sound effects for each case where we show a toast to further engage the user. This helps distinguish the different toasts and helps users build up an expectation of what each sound means. For this we’ll make use of the HTML5 Audio API and use sounds from freesounds.org. To load the sound files into our application, we’ll create a ref for each one, then we simply call theplay() method on each when we want to actually play the sound:
src/app/flashcards.tsx
Displaying Study Journey
The last piece of UI we’ll add will be a dialog to display the user’s study progress, including their streak and any achievements they’ve unlocked so far. First, we’ll add a couple of new server actions to fetch the users streak and achievements from Trophy. As we’re using a daily streak here, we’ll fetch the last 14 days of streak data from Trophy to give us enough to work with in our UI:src/app/actions.ts
src/app/page.tsx
<StudyJourney /> component that takes in the achievements and streak data as props and renders it nicely in a dialog. Before adding this we need to add the shadcn/ui dialog component to our project, and while we’re at it, we’ll add the seperator component too:
dayjs to help us with displaying dates nicely as well:
src/app/study-journey.tsx
src/app/page.tsx
Adding an XP System
Now let’s take our study platform to the next level by adding an XP (points) system. This will give users a sense of progression and reward them for their study activity.Setting Up Points in Trophy
First, head to the Trophy points page and create a new points system. We’ll call ours “XP” with the keypoints.
Integrating Points API
Add new server actions to fetch points data:src/app/actions.ts
Creating a Points Context
To manage points state across the app, create a React context:src/contexts/UserPointsContext.tsx
Building the Points Center UI
Create a points display component that shows the user’s XP with a satisfying number animation:src/app/user-center/points-center/points-center.tsx
Updating Points on Flashcard View
Finally, re-fetch points whenever a user views a flashcard to show real-time XP updates:src/app/flashcards.tsx
Adding Leaderboards
Nothing drives engagement like friendly competition. Let’s add a leaderboard to show how users stack up against each other.Setting Up Leaderboards in Trophy
Head to the Trophy leaderboards page and create a new leaderboard. We’ll create a daily leaderboard with the keydaily-champions that ranks users by flashcards viewed.
Leaderboard API Integration
Add server actions for fetching leaderboard data:src/app/actions.ts
Building the Leaderboard UI
Create a leaderboard component that displays rankings with pagination:src/app/leaderboard-center/leaderboard-center.tsx
Adding an Energy System
Energy (or “lives”) systems are a proven retention mechanic that encourages users to return throughout the day. Let’s add one to our study platform.Setting Up Energy in Trophy
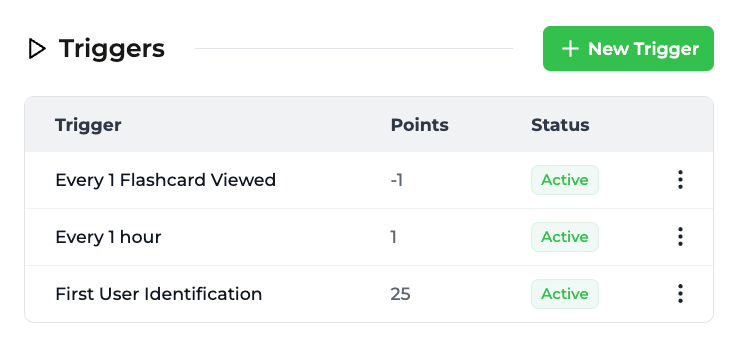
Trophy’s points system is flexible enough to handle energy mechanics. Create a new points system with the keyenergy and configure it with:
- A maximum cap (e.g., 5 energy)
- Automatic regeneration rules
- Costs per action (e.g., -1 energy per flashcard session)
Energy API Integration
Add server actions for energy management:src/app/actions.ts
Creating an Energy Context
Similar to points, create a context for managing energy state:src/contexts/UserEnergyContext.tsx
Building the Energy UI
Create an energy display that shows remaining energy with visual indicators:src/app/energy-center/energy-center.tsx
The Result
Congrats! If you’re reading this you made it to the end of the tutorial and built yourself a fully-functioning study platform. Of course there’s loads more we could do to this, so here’s a few ideas:- Persist flashcards to a database
- Create multiple flashcard sets for other topics
- Add authentication
- Allow users to create their own flashcard sets