> ## Documentation Index
> Fetch the complete documentation index at: https://docs.trophy.so/llms.txt
> Use this file to discover all available pages before exploring further.

# How to Build a Gamified Study Platform

> Follow along as we build out a gamified study platform using Trophy with achievements, a daily streak, XP and leaderboards.

In this tutorial we'll build an example study platform using Trophy for gamification. If you want to just skip to the end then feel free to check out the [example repository](https://github.com/trophyso/example-study-platform) or the [live demo](https://study.examples.trophy.so).

<Frame>
  <video autoPlay muted loop playsInline className="w-full aspect-15/4" src="https://mintcdn.com/trophy/TwFTsrgzoQZ8iwx1/assets/guides/example-apps/example-study-app/intro-demo.mp4?fit=max&auto=format&n=TwFTsrgzoQZ8iwx1&q=85&s=64217993a040f60c62bbf92928d403fd" data-path="assets/guides/example-apps/example-study-app/intro-demo.mp4" />
</Frame>

<h2 id="table-of-contents">
  Table of Contents
</h2>

* [Tech Stack](#tech-stack)
* [Pre-requisites](#pre-requisites)
* [Setup & Installation](#setup-installation)
* [Building the Flashcards Feature](#building-the-flashcards-feature)
* [Adding Basic Gamification](#adding-basic-gamification)
* [Adding an XP System](#adding-an-xp-system)
* [Adding Leaderboards](#adding-leaderboards)
* [Adding an Energy System](#adding-an-energy-system)
* [The Result](#the-result)

<h2 id="tech-stack">
  Tech Stack
</h2>

* [NextJS 15](https://nextjs.org/docs) (React 19)
* [Shadcn/Ui](https://ui.shadcn.com)
* [Lucide](https://lucide.dev/icons) for iconography
* [Motion](https://motion.dev/) for animations
* [HTML5 Audio API](https://developer.mozilla.org/en-US/docs/Web/API/Web_Audio_API) for sound effects
* [Trophy](https://trophy.so) for gamification

<h2 id="pre-requisites">
  Pre-requisites
</h2>

* A Trophy account (don't worry we'll set this up as we go along...)

<h2 id="setup-installation">
  Setup & Installation
</h2>

<Tip>
  Want to skip the setup? Head straight to [the fun
  part](#setting-up-flashcard-data).
</Tip>

First we need to create a new NextJS project:

```bash theme={null}
npx create-next-app@latest
```

Feel free to configure this new project however you like but for the purposes of this tutorial we'll pretty much stick with the defaults:

```bash theme={null}
What is your project named? my-app
Would you like to use TypeScript? Yes
Would you like to use ESLint? Yes
Would you like to use Tailwind CSS? Yes
Would you like your code inside a `src/` directory? Yes
Would you like to use App Router? (recommended) Yes
Would you like to use Turbopack for `next dev`?  Yes
Would you like to customize the import alias (`@/*` by default)? No
```

Next, we'll initialize a new install of everyone's favourite UI library, shadcn/ui:

```bash theme={null}
npx shadcn@latest init
```

I ran into a warning with React 19, which [looks to be a common issue](https://ui.shadcn.com/docs/react-19) when initializing with `npm`:

```bash theme={null}
It looks like you are using React 19.
Some packages may fail to install due to peer dependency issues in npm (see https://ui.shadcn.com/react-19).

? How would you like to proceed? › - Use arrow-keys. Return to submit.
❯   Use --force
    Use --legacy-peer-deps
```

For the purposes of this tutorial I chose `--force` but you should choose whichever setting you feel suits your requirements.

<h2 id="building-the-flashcards-feature">
  Building the Flashcards Feature
</h2>

<h3 id="setting-up-flashcard-data">
  Setting Up Flashcard Data
</h3>

For the purposes of this tutorial, we're going to be using some simple types with an in-memory data store. In a production application you'd probably want to consider storing this information in a database.

Here we'll have a very simple type that stores information about each flashcard where we'll use the `front` property to store questions that the student wants to learn the answer to, and the `back` property to store the answers to each question:

```ts src/types/flashcard.ts theme={null}
export interface IFlashcard {
  id: string;
  front: string;
  back: string;
}
```

Then to get us started we'll store a few flashcards in memory centered around learning capital cities:

```ts src/data.ts [expandable] theme={null}
import { IFlashcard } from "./types/flashcard";

export const flashcards: IFlashcard[] = [
  {
    id: "1",
    front: "What is the capital of France?",
    back: "Paris",
  },
  {
    id: "2",
    front: "What is the capital of Germany?",
    back: "Berlin",
  },
  {
    id: "3",
    front: "What is the capital of Italy?",
    back: "Rome",
  },
  {
    id: "4",
    front: "What is the capital of Spain?",
    back: "Madrid",
  },
  {
    id: "5",
    front: "What is the capital of Portugal?",
    back: "Lisbon",
  },
  {
    id: "6",
    front: "What is the capital of Greece?",
    back: "Athens",
  },
  {
    id: "7",
    front: "What is the capital of Turkey?",
    back: "Ankara",
  },
  {
    id: "8",
    front: "What is the capital of Poland?",
    back: "Warsaw",
  },
  {
    id: "9",
    front: "What is the capital of Romania?",
    back: "Bucharest",
  },
  {
    id: "10",
    front: "What is the capital of Bulgaria?",
    back: "Sofia",
  },
  {
    id: "11",
    front: "What is the capital of Hungary?",
    back: "Budapest",
  },
  {
    id: "12",
    front: "What is the capital of Czechia?",
    back: "Prague",
  },
  {
    id: "13",
    front: "What is the capital of Slovakia?",
    back: "Bratislava",
  },
  {
    id: "14",
    front: "What is the capital of Croatia?",
    back: "Zagreb",
  },
  {
    id: "15",
    front: "What is the capital of Serbia?",
    back: "Belgrade",
  },
  {
    id: "16",
    front: "What is the capital of Montenegro?",
    back: "Podgorica",
  },
  {
    id: "17",
    front: "What is the capital of North Macedonia?",
    back: "Skopje",
  },
  {
    id: "18",
    front: "What is the capital of Kosovo?",
    back: "Pristina",
  },
  {
    id: "19",
    front: "What is the capital of Albania?",
    back: "Tirana",
  },
  {
    id: "20",
    front: "What is the capital of Bosnia and Herzegovina?",
    back: "Sarajevo",
  },
];
```

<h3 id="basic-flashcard-layout">
  Basic Flashcard Layout
</h3>

With some basic data set up, we need to add a way for users to flick through their flashcards.

For this we'll use the `carousel` and `card` components from shadcn/ui so we need to add these to our project:

```bash theme={null}
npx shadcn@latest add carousel card
```

Then, we'll create a new `<Flashcards />` component that combines these into a working solution, specifying that we can pass along any list of `IFlashcard` objects as props

```tsx src/app/flashcards.tsx [expandable] theme={null}
import {
  Carousel,
  CarouselContent,
  CarouselItem,
  CarouselPrevious,
  CarouselNext,
} from "@/components/ui/carousel";
import { Card, CardContent } from "@/components/ui/card";
import { IFlashcard } from "@/types/flashcard";

interface Props {
  flashcards: IFlashcard[];
}

export default function Flashcards({ flashcards }: Props) {
  return (
    <Carousel className="w-full max-w-md">
      <CarouselContent>
        {flashcards.map((flashcard) => (
          <CarouselItem key={flashcard.id}>
            <div className="p-1">
              <Card>
                <CardContent className="flex items-center justify-center p-6">
                  <span className="text-4xl text-center font-semibold">
                    {flashcard.front}
                  </span>
                </CardContent>
              </Card>
            </div>
          </CarouselItem>
        ))}
      </CarouselContent>
      <CarouselPrevious />
      <CarouselNext />
    </Carousel>
  );
}
```

Then we'll update our `page.tsx` file to display our `<Flashcards />` component, passing in our example flashcard data:

```tsx src/app/page.tsx theme={null}
import { flashcards } from "@/data";
import Flashcards from "./flashcards";

export default function Home() {
  return (
    <div className="flex flex-col items-center justify-center h-screen">
      <Flashcards flashcards={flashcards} />
    </div>
  );
}
```

At the end of this step, you should have a working flashcard UI that allows you to flick through each flashcard in our cities data set.

<Frame>
  <video autoPlay muted loop playsInline className="w-full aspect-video" src="https://mintcdn.com/trophy/TwFTsrgzoQZ8iwx1/assets/guides/example-apps/example-study-app/basic-flashcard-ui.mp4?fit=max&auto=format&n=TwFTsrgzoQZ8iwx1&q=85&s=2af5ccdb44f66381cca3805b61ad2e8f" data-path="assets/guides/example-apps/example-study-app/basic-flashcard-ui.mp4" />
</Frame>

<h3 id="flipping-flashcards">
  Flipping Flashcards
</h3>

Now this is great, but it's not much use as a study app right now as there's no way to see if you got the answer right! We need to add a way to flip flashcards over and check our answer...

To make this simpler, we'll first create a `<Flashcard />` component that will be responsible for all the logic for each flashcard:

```tsx src/app/flashcard.tsx [expandable] theme={null}
import { Card, CardContent } from "@/components/ui/card";
import { CarouselItem } from "@/components/ui/carousel";
import { IFlashcard } from "@/types/flashcard";

interface Props {
  flashcard: IFlashcard;
}

export default function Flashcard({ flashcard }: Props) {
  return (
    <CarouselItem key={flashcard.id}>
      <div className="p-1">
        <Card>
          <CardContent className="flex items-center justify-center p-6">
            <span className="text-4xl text-center font-semibold">
              {flashcard.front}
            </span>
          </CardContent>
        </Card>
      </div>
    </CarouselItem>
  );
}
```

Then we'll simplify our `<Flashcards />` component to instead just render out a list of the individual `<Flashcard />` components:

```tsx src/app/flashcards.tsx [expandable] theme={null}
import {
  Carousel,
  CarouselContent,
  CarouselPrevious,
  CarouselNext,
} from "@/components/ui/carousel";
import { IFlashcard } from "@/types/flashcard";
import Flashcard from "./flashcard";

interface Props {
  flashcards: IFlashcard[];
}

export default function Flashcards({ flashcards }: Props) {
  return (
    <Carousel className="w-full max-w-md">
      <CarouselContent>
        {flashcards.map((flashcard) => (
          <Flashcard key={flashcard.id} flashcard={flashcard} />
        ))}
      </CarouselContent>
      <CarouselPrevious />
      <CarouselNext />
    </Carousel>
  );
}
```

Now we're ready to add interactivity to each flashcard. Here's what we'll do:

* First, we'll add a `side` state variable that will hold the current side of the flashcard that's showing.
* Next, we'll add an `onClick()` callback to the `<Card />` component that will update the `side` state to `back` when clicked if the front of the card is currently showing.
* Finally, we'll conditional render the text in the `<Card />` based on the value of the `side` state variable.

Here's the finished file:

```tsx src/app/flashcard.tsx [expandable] {10,12-16,21,24} theme={null}
import { Card, CardContent } from "@/components/ui/card";
import { CarouselItem } from "@/components/ui/carousel";
import { IFlashcard } from "@/types/flashcard";

interface Props {
  flashcard: IFlashcard;
}

export default function Flashcard({ flashcard }: Props) {
  const [side, setSide] = useState<"front" | "back">("front");

  const handleCardClick = () => {
    if (side === "front") {
      setSide("back");
    }
  };

  return (
    <CarouselItem key={flashcard.id}>
      <div className="p-1">
        <Card onClick={handleCardClick}>
          <CardContent className="flex items-center justify-center p-6">
            <span className="text-4xl text-center font-semibold">
              {side === "front" ? flashcard.front : flashcard.back}
            </span>
          </CardContent>
        </Card>
      </div>
    </CarouselItem>
  );
}
```

Then, we'll use [Motion](https://motion.dev) to add a neat flip animation to the card when we click on it. For this we first need to install the package into our project:

```bash theme={null}
npm install motion
```

If you think about it, when you flip a flashcard, you tend to do it in the Y-axis. So here we'll use a `<motion.div />` with a light spring animation in the y-axis to create the effect:

```tsx src/app/flashcard.tsx [expandable] {7-8,26-37} theme={null}
"use client";

import { Card, CardContent } from "@/components/ui/card";
import { CarouselItem } from "@/components/ui/carousel";
import { IFlashcard } from "@/types/flashcard";
import { useState } from "react";
import { motion } from "motion/react";
import styles from "./flashcard.module.css";

interface Props {
  flashcard: IFlashcard;
}

export default function Flashcard({ flashcard }: Props) {
  const [side, setSide] = useState<"front" | "back">("front");

  const handleCardClick = () => {
    if (side === "front") {
      setSide("back");
    }
  };

  return (
    <CarouselItem key={flashcard.id}>
      <div className="p-1">
        <motion.div
          onClick={handleCardClick}
          className="cursor-pointer"
          animate={{ rotateY: side === "front" ? 0 : 180 }}
          transition={{ duration: 1, type: "spring" }}
          style={{ perspective: "1000px" }}
        >
          <Card className={`relative w-full h-[200px] ${styles.card}`}>
            <CardContent
              className={`flex items-center justify-center p-6 absolute w-full h-full ${styles.backface_hidden}`}
            >
              <span className="text-4xl text-center font-semibold">
                {side === "front" ? flashcard.front : flashcard.back}
              </span>
            </CardContent>
          </Card>
        </motion.div>
      </div>
    </CarouselItem>
  );
}
```

You'll notice we also added a couple of styles here. These do a couple of things:

* Ensure that when a `<Card />` is flipping, the 'back face' isn't visible during the animation with `backface-visibility: hidden;`
* As the `<Card />` component is a child of the `<motion.div />`, usually it would appear flat when it's parent rotates in 3D. Adding `transform-style: preserve-3d;` to the `<Card />` ensures it keeps it's 3D effect when it's parent animates.

```css src/app/flashcard.module.css theme={null}
.backface-hidden {
  backface-visibility: hidden;
  -webkit-backface-visibility: hidden;
}

.card {
  transform-style: preserve-3d;
  -webkit-transform-style: preserve-3d;
}
```

<h3 id="a-flippin-bug">
  A Flippin' Bug!
</h3>

Sweet! Our project is now starting to feel like a real study tool! However the keen eyed (or maybe not so keen...) will notice there's one major bug here. When we flip a card over, the answer on the back appears in reverse 😢...

<Frame>
  <video autoPlay muted loop playsInline className="w-full aspect-video" src="https://mintcdn.com/trophy/TwFTsrgzoQZ8iwx1/assets/guides/example-apps/example-study-app/flipping-flashcards.mp4?fit=max&auto=format&n=TwFTsrgzoQZ8iwx1&q=85&s=a6f309b799a8c2816406e42324cc6537" data-path="assets/guides/example-apps/example-study-app/flipping-flashcards.mp4" />
</Frame>

I you think about it, when you write a flashcard, you actually write the answer on the back in the opposite direction to the question on the front.

And as we're using `motion` to literally flip over our card in the Y-axis, we need to make sure we write our answers backwards as well.

First, we'll add a little CSS snippet to handle writing text backwards:

```css src/app/flascard.module.css {11-14} theme={null}
.backface-hidden {
  backface-visibility: hidden;
  -webkit-backface-visibility: hidden;
}

.card {
  transform-style: preserve-3d;
  -webkit-transform-style: preserve-3d;
}

.flipped_text {
  transform: scaleX(-1);
  transform-origin: center;
}
```

Then we'll conditionally add this style to our card text based on which side of the card is showing:

```tsx src/app/flashcard.tsx theme={null}
<span
  className={`text-4xl text-center font-semibold ${
    side === "back" ? styles.flipped_text : ""
  }`}
>
  {side === "front" ? flashcard.front : flashcard.back}
</span>
```

Ok awesome. Now when we flip over a card the answer on the back should read in the right direction:

<Frame>
  <video autoPlay muted loop playsInline className="w-full aspect-video" src="https://mintcdn.com/trophy/TwFTsrgzoQZ8iwx1/assets/guides/example-apps/example-study-app/flipping-flashcards-fixed.mp4?fit=max&auto=format&n=TwFTsrgzoQZ8iwx1&q=85&s=fc78ce97647ed82e2e6ecd0ab13e02dd" data-path="assets/guides/example-apps/example-study-app/flipping-flashcards-fixed.mp4" />
</Frame>

<h3 id="tracking-progress">
  Tracking Progress
</h3>

The next step is to add some UI to show the user how many flashcards they've looked at, and how many in the set they have left. We'll use a simple progress bar to achieve this.

Before we can start tracking this level of information, we need to set up tracking for a new state variable that holds the index of the flashcard the user is currently looking at. We'll use the [carousel api](https://ui.shadcn.com/docs/components/carousel#api) to hook into the functionality here and keep our state variable up to date:

```tsx src/app/flashcards.tsx [expandable] {1,8,19-34,37} theme={null}
"use client";

import {
  Carousel,
  CarouselContent,
  CarouselPrevious,
  CarouselNext,
  type CarouselApi,
} from "@/components/ui/carousel";
import { IFlashcard } from "@/types/flashcard";
import Flashcard from "./flashcard";
import { useEffect, useState } from "react";

interface Props {
  flashcards: IFlashcard[];
}

export default function Flashcards({ flashcards }: Props) {
  const [flashIndex, setFlashIndex] = useState(0);
  const [api, setApi] = useState<CarouselApi>();

  useEffect(() => {
    if (!api) {
      return;
    }

    // Initialize the flash index
    setFlashIndex(api.selectedScrollSnap() + 1);

    // Update the flash index when the carousel is scrolled
    api.on("select", () => {
      setFlashIndex(api.selectedScrollSnap() + 1);
    });
  }, [api]);

  return (
    <Carousel className="w-full" setApi={setApi}>
      <CarouselContent>
        {flashcards.map((flashcard) => (
          <Flashcard key={flashcard.id} flashcard={flashcard} />
        ))}
      </CarouselContent>
      <CarouselPrevious />
      <CarouselNext />
    </Carousel>
  );
}
```

Then we need to add the `progress` component from shadcn/ui to our project:

```bash theme={null}
npx shadcn@latest add progress
```

Finally we can add a progress bar above the carousel:

```tsx [expandable] {13,38-39,49} theme={null}
"use client";

import {
  Carousel,
  CarouselContent,
  CarouselPrevious,
  CarouselNext,
  type CarouselApi,
} from "@/components/ui/carousel";
import { IFlashcard } from "@/types/flashcard";
import Flashcard from "./flashcard";
import { useEffect, useState } from "react";
import { Progress } from "@/components/ui/progress";

interface Props {
  flashcards: IFlashcard[];
}

export default function Flashcards({ flashcards }: Props) {
  const [flashIndex, setFlashIndex] = useState(0);
  const [api, setApi] = useState<CarouselApi>();

  useEffect(() => {
    if (!api) {
      return;
    }

    // Initialize the flash index
    setFlashIndex(api.selectedScrollSnap() + 1);

    // Update the flash index when the carousel is scrolled
    api.on("select", () => {
      setFlashIndex(api.selectedScrollSnap() + 1);
    });
  }, [api]);

  return (
    <div className="flex flex-col items-center justify-center gap-4 max-w-md">
      <Progress value={(flashIndex / flashcards.length) * 100} />
      <Carousel className="w-full" setApi={setApi}>
        <CarouselContent>
          {flashcards.map((flashcard) => (
            <Flashcard key={flashcard.id} flashcard={flashcard} />
          ))}
        </CarouselContent>
        <CarouselPrevious />
        <CarouselNext />
      </Carousel>
    </div>
  );
}
```

Sweet! Now things are really starting to come together.

<Frame>
  <video autoPlay muted loop playsInline className="w-full aspect-video" src="https://mintcdn.com/trophy/TwFTsrgzoQZ8iwx1/assets/guides/example-apps/example-study-app/progress-tracking.mp4?fit=max&auto=format&n=TwFTsrgzoQZ8iwx1&q=85&s=d1a5507fbedfcb4bb927dd214b749c39" data-path="assets/guides/example-apps/example-study-app/progress-tracking.mp4" />
</Frame>

Now the real fun begins...

<h2 id="adding-basic-gamification">
  Adding Basic Gamification
</h2>

In this section we'll be adding the following gamification elements to the flashcard project:

* Achievements for completing:
  * 10 flashcards
  * 50 flashcards
  * 100 flashcards
  * 250 flashcards
* Daily streak for completing at least one flashcard a day.
* Automated emails for:
  * Achievement unlocked
  * Weekly progress summaries

This might sound like a lot, but would you be surprised if I told you could build all this in less than 10 lines of code?

Yup, you can. Trophy makes it super easy to build these features with a few lines of integration code.

So, let's get started...

<h3 id="how-trophy-works">
  How Trophy Works
</h3>

First off, we need a new [Trophy account](https://app.trophy.so/sign-up). Then we can start to piece together the various parts of our gamification experience.

In Trophy, [Metrics](/features/metrics) represent different interactions users can make and can drive features like [Achievements](/features/achievements), [Streaks](/features/streaks) and [Emails](/features/emails).

```mermaid theme={null}
flowchart TD
    A@{ shape: rounded, label: "Events" }
    B@{ shape: rounded, label: "Metrics" }
    C@{ shape: rounded, label: "Achievements" }
    D@{ shape: rounded, label: "Streaks" }
    E@{ shape: rounded, label: "Points" }
    F@{ shape: rounded, label: "Leaderboards" }
    A-.->B
    B-->C
    B-->D
    B-->E
    B-->F
```

In Trophy we track user interactions by sending [Events](/features/events) from our code to Trophy against a specific metric.

When events are recorded for a specific user, any achievements linked to the specified metric will be unlocked if the requirements are met, daily streaks will be automatically calculated and kept up to date, points are awarded, and leaderboards are updated.

This is what makes building gamified experiences with Trophy so easy, is does all the work for you behind the scenes.

Recording an event against a metric for a specific user makes use of Trophy's [metric event API](/api-reference/endpoints/metrics/send-a-metric-change-event), which in practice looks like this:

<CodeGroup>
  ```bash cURL theme={null}
  curl -X POST https://app.trophy.so/api/metrics/flashcards-flipped/event \
       -H "X-API-KEY: <apiKey>" \
       -H "Content-Type: application/json" \
       -d '{
    "user": {
      "id": "18",
      "email": "user@example.com",
      "tz": "Europe/London"
    },
    "value": 750
  }'
  ```

  ```typescript Node theme={null}
  trophy.metrics.event("flashcards-flipped", {
    user: {
      id: "18",
      email: "user@example.com",
      tz: "Europe/London",
    },
    value: 750,
  });
  ```

  ```python Python theme={null}
  client.metrics.event(
      key="flashcards-flipped",
      user=EventRequestUser(
          id="18",
          email="user@example.com",
          tz="Europe/London",
      ),
      value=750.0,
  )
  ```

  ```php PHP theme={null}
  $user = new EventRequestUser([
      'id' => '18',
      'email' => 'user@example.com'
  ]);

  $request = new MetricsEventRequest([
      'user' => $user,
      'value' => 750
  ]);

  $trophy->metrics->event("flashcards-flipped", $request);
  ```

  ```java Java theme={null}
  MetricsEventRequest request = MetricsEventRequest.builder()
        .user(
          EventRequestUser.builder()
            .id("18")
            .email("user@example.com")
            .build()
        )
        .value(750)
        .build();

  EventResponse response = client.metrics().event("flashcards-flipped", request);
  ```

  ```go Go theme={null}
  response, err := client.Metrics.Event(
      "flashcards-flipped",
      &api.MetricsEventRequest{
          User: &api.EventRequestUser{
              Id: "18",
              Email: "user@example.com",
          },
          Value: 750,
      },
  )
  ```

  ```csharp C# theme={null}
  var user = new EventRequestUser {
     Id = "18",
     Email = "user@example.com"
  };

  var request = new MetricsEventRequest {
     User = user,
     Value = 750
  };

  await trophy.Metrics.EventAsync("flashcards-flipped", request);
  ```

  ```ruby Ruby theme={null}
  result = client.metrics.event(
    :key => 'flashcards-flipped',
    :user => {
      :id => '18',
      :email => 'user@example.com'
    },
    :value => 750
  )
  ```
</CodeGroup>

That's how in just a few lines of code we can power a whole suite of gamification features. However, before we can start sending events, we need to set up our new Trophy account.

<h3 id="setting-up-trophy">
  Setting Up Trophy
</h3>

Here's how we'll setup our Trophy account for our study app:

* First, we'll set up a *Flashcards Flipped* metric
* Next, we'll setup achievements linked to this metric
* Then, we'll configure a daily streak linked to this metric
* Finally, we'll configure automated email sequences for this metric

Let's get into it...
<AccordionGroup>
  <Accordion title="Create the metric" icon="box">
    Head into the Trophy [metrics page](https://app.trophy.so/metrics) and create a new metric, making sure to specify `flashcards-flipped` as the metric `key`. This is what we'll use to reference the metric in our code when sending events.

    <Frame>
      <video autoPlay muted loop playsInline className="w-full aspect-video" src="https://mintcdn.com/trophy/TwFTsrgzoQZ8iwx1/assets/guides/example-apps/example-study-app/create-metric.mp4?fit=max&auto=format&n=TwFTsrgzoQZ8iwx1&q=85&s=b8350636bc4c80a1a4772c2c8049fd5d" data-path="assets/guides/example-apps/example-study-app/create-metric.mp4" />
    </Frame>
  </Accordion>

  <Accordion title="Create achievements" icon="trophy">
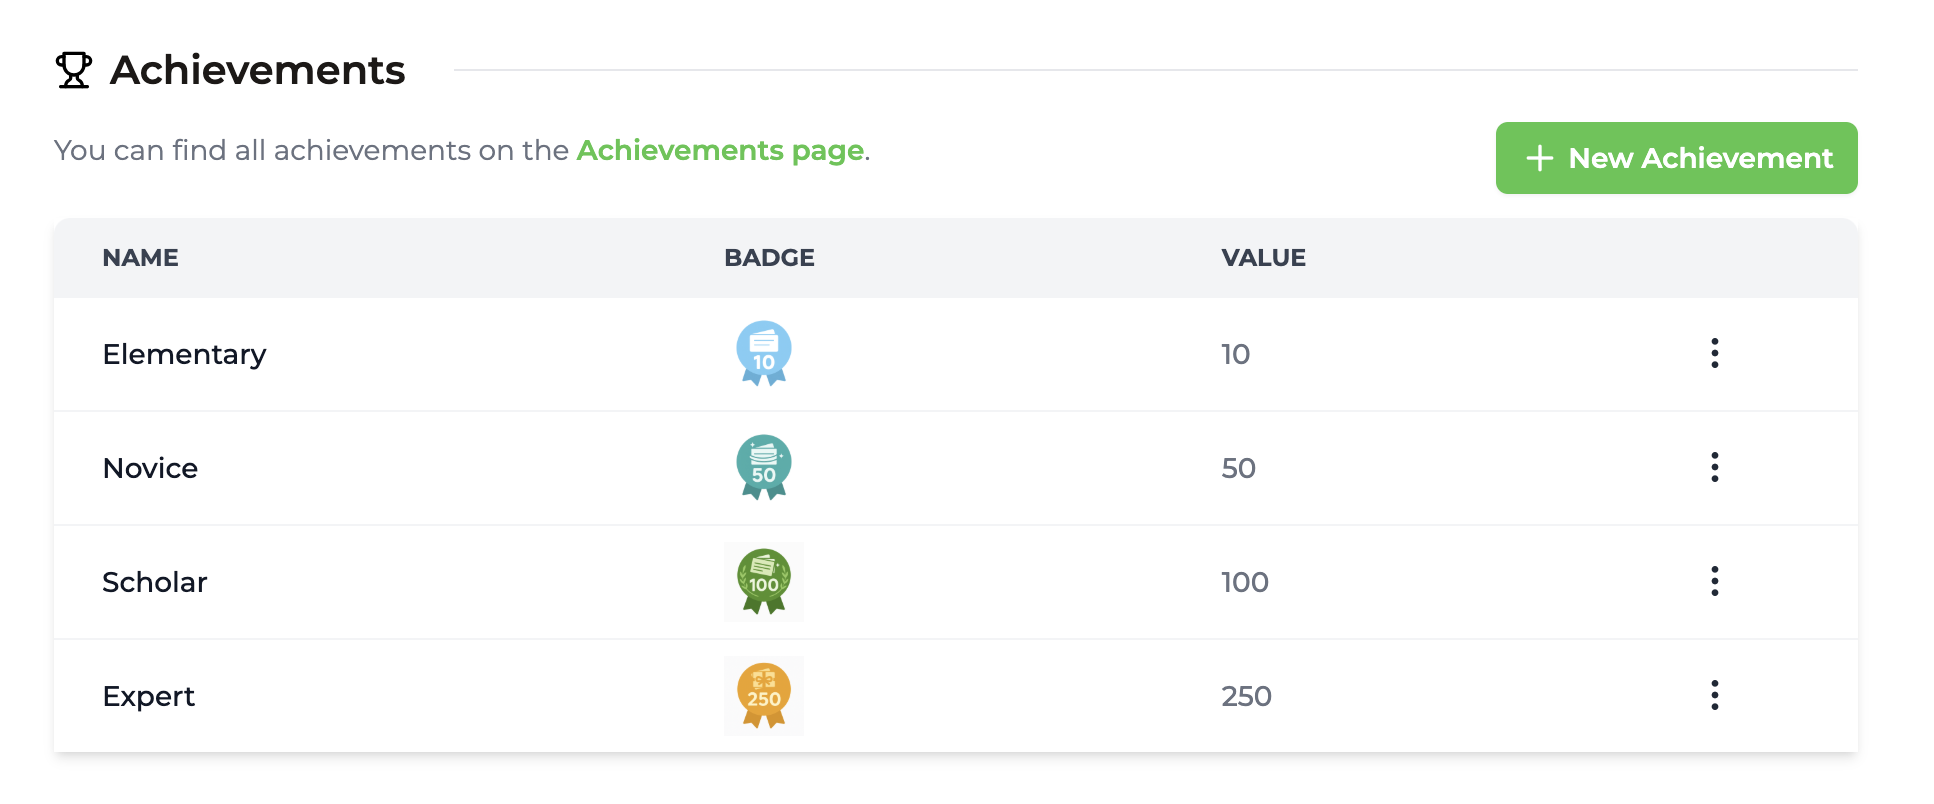
    Next, create one achievement for each of the following milestones:

    * 10 flashcards (Elementary)
    * 50 flashcards (Novice)
    * 100 flashcards (Scholar)
    * 250 flashcards (Expert)

    {" "}

    <Tip>
      Feel free to download and use this zip of badges (ready made for this example
      app):
      [flashcard\_badges.zip](../assets/guides/example-apps/example-study-app/flashcard_badges.zip)
    </Tip>

    <Frame>
      <img height="200" width="100%" noZoom src="https://mintcdn.com/trophy/TwFTsrgzoQZ8iwx1/assets/guides/example-apps/example-study-app/achievements.png?fit=max&auto=format&n=TwFTsrgzoQZ8iwx1&q=85&s=8942c20cca4ab2193d1d5ef1f871a65e" data-path="assets/guides/example-apps/example-study-app/achievements.png" />
    </Frame>
  </Accordion>

  <Accordion title="Configure daily streak" icon="flame">
    Next, head into the [streaks page](https://app.trophy.so/streaks) and set up a daily streak.

    <Frame>
      <video autoPlay muted loop playsInline className="w-full aspect-video" src="https://mintcdn.com/trophy/TwFTsrgzoQZ8iwx1/assets/guides/example-apps/example-study-app/configure-streak.mp4?fit=max&auto=format&n=TwFTsrgzoQZ8iwx1&q=85&s=0a45cb9c4b0434854d422bf588357102" data-path="assets/guides/example-apps/example-study-app/configure-streak.mp4" />
    </Frame>
  </Accordion>

  <Accordion title="Configure emails" icon="mail">
    Head into the [emails page](https://app.trophy.so/emails) and add and activate templates for the two types of emails we want.

    * Achievement unlocked emails
    * Recap emails (weekly)

    Each email type has its own section—add a template under each and activate it to start sending.

    Trophy also gives us a preview of the emails which is nice. Plus, feel free to configure a nice logo and brand colors in the [branding page](https://app.trophy.so/branding). These settings are automatically used in all emails sent by Trophy.

    {" "}

    <Frame>
      <video autoPlay muted loop playsInline className="w-full aspect-video" src="https://mintcdn.com/trophy/TwFTsrgzoQZ8iwx1/assets/guides/example-apps/example-study-app/configure-emails.mp4?fit=max&auto=format&n=TwFTsrgzoQZ8iwx1&q=85&s=55ce2a5df71bf81023e40b0d6b6717c9" data-path="assets/guides/example-apps/example-study-app/configure-emails.mp4" />
    </Frame>

    {" "}

    <Note>
      Before you can start sending emails, you'll need to [configure your sending
      address](/features/emails#sending-emails) with Trophy. But this can be done
      later on if preferred.
    </Note>
  </Accordion>
</AccordionGroup>

<h3 id="integrating-trophy-sdk">
  Integrating Trophy SDK
</h3>

First we need to grab our API key from the Trophy [integration page](https://app.trophy.so/integration) and add this as a **server-side only** environment variable.

<Warning>
  Make sure you **don't** expose your API key in client-side code
</Warning>

```bash .env.local theme={null}
TROPHY_API_KEY='*******'
```

Next, we'll install the Trophy SDK:

```bash theme={null}
npm install @trophyso/node
```

Then whenever a user views a flashcard, we simply send an event to Trophy with details of the user that performed the action (which we'll mock), and the number of flashcards they viewed (1 in this case).

In NextJS we'll do this with a server action that makes the call to Trophy to send the event, and we'll call this action when the user moves to the next flashcard in the carousel.

First, create the server action:

```tsx src/app/actions.ts [expandable] theme={null}
"use server";

import { TrophyApiClient } from "@trophyso/node";
import { EventResponse } from "@trophyso/node/api";

// Set up Trophy SDK with API key
const trophy = new TrophyApiClient({
  apiKey: process.env.TROPHY_API_KEY as string,
});

/**
 * Track a flashcard viewed event in Trophy
 * @returns The event response from Trophy
 */
export async function viewFlashcard(): Promise<EventResponse | null> {
  try {
    return await trophy.metrics.event("flashcards-flipped", {
      user: {
        // Mock email
        email: "user@example.com",

        // Mock timezone
        tz: "Europe/London",

        // Mock user ID
        id: "18",
      },

      // Event represents a single user viewing 1 flashcard
      value: 1,
    });
  } catch (error) {
    console.error(error);
    return null;
  }
}
```

Then call it when the user views the next flashcard:

```tsx src/app/flashcards.tsx [expandable] {14,36-37} theme={null}
"use client";

import {
  Carousel,
  CarouselContent,
  CarouselPrevious,
  CarouselNext,
  type CarouselApi,
} from "@/components/ui/carousel";
import { IFlashcard } from "@/types/flashcard";
import Flashcard from "./flashcard";
import { useEffect, useState } from "react";
import { Progress } from "@/components/ui/progress";
import { viewFlashcard } from "./actions";

interface Props {
  flashcards: IFlashcard[];
}

export default function Flashcards({ flashcards }: Props) {
  const [flashIndex, setFlashIndex] = useState(0);
  const [api, setApi] = useState<CarouselApi>();

  useEffect(() => {
    if (!api) {
      return;
    }

    // Initialize the flash index
    setFlashIndex(api.selectedScrollSnap() + 1);

    api.on("select", () => {
      // Update the flash index when the carousel is scrolled
      setFlashIndex(api.selectedScrollSnap() + 1);

      // Track the flashcard viewed event
      viewFlashcard();
    });
  }, [api]);

  return (
    <div className="flex flex-col items-center justify-center gap-4 max-w-md">
      <Progress value={(flashIndex / flashcards.length) * 100} />
      <Carousel className="w-full" setApi={setApi}>
        <CarouselContent>
          {flashcards.map((flashcard) => (
            <Flashcard key={flashcard.id} flashcard={flashcard} />
          ))}
        </CarouselContent>
        <CarouselPrevious />
        <CarouselNext />
      </Carousel>
    </div>
  );
}
```

We can validate this is working by checking the Trophy [dashboard](https://app.trophy.so) which should show our first user tracked in the *Top Users* table:

<Frame>
  <img height="200" width="100%" noZoom src="https://mintcdn.com/trophy/TwFTsrgzoQZ8iwx1/assets/guides/example-apps/example-study-app/top-users.png?fit=max&auto=format&n=TwFTsrgzoQZ8iwx1&q=85&s=525c64a0b4fae29bf6613fe1ac9f4327" data-path="assets/guides/example-apps/example-study-app/top-users.png" />
</Frame>

Next, we'll add some UI to show off our gamification features in practice.

<h3 id="adding-gamification-ux">
  Adding Gamification UX
</h3>

The response to the API call that we make to track events in Trophy helpfully gives us back any changes to the users progress as a result of that event:

```json Response [expandable] theme={null}
{
  "metricId": "d01dcbcb-d51e-4c12-b054-dc811dcdc623",
  "eventId": "0040fe51-6bce-4b44-b0ad-bddc4e123534",
  "total": 750,
  "achievements": [
    {
      "id": "5100fe51-6bce-6j44-b0hs-bddc4e123682",
      "trigger": "metric",
      "metricId": "5100fe51-6bce-6j44-b0hs-bddc4e123682",
      "metricName": "Flashcards Flipped",
      "metricValue": 500,
      "name": "500 Flashcards Flipped",
      "description": "Write 500 words in the app.",
      "achievedAt": "2020-01-01T00:00:00Z"
    }
  ],
  "currentStreak": {
    "length": 1,
    "frequency": "daily",
    "started": "2025-04-02",
    "periodStart": "2025-03-31",
    "periodEnd": "2025-04-05",
    "expires": "2025-04-12"
  },
  "points": {
    "xp": {
      "id": "0040fe51-6bce-4b44-b0ad-bddc4e123534",
      "key": "xp",
      "name": "XP",
      "description": null,
      "badgeUrl": null,
      "maxPoints": null,
      "total": 10,
      "level": {
        "id": "1140fe51-6bce-4b44-b0ad-bddc4e123534",
        "key": "bronze",
        "name": "Bronze",
        "description": "Starting level",
        "badgeUrl": null,
        "points": 0
      },
      "added": 10,
      "awards": [
        {
          "id": "0040fe51-6bce-4b44-b0ad-bddc4e123534",
          "awarded": 10,
          "date": "2021-01-01T00:00:00Z",
          "total": 10,
          "trigger": {
            "id": "0040fe51-6bce-4b44-b0ad-bddc4e123534",
            "type": "metric",
            "metricName": "Flashcards Flipped",
            "metricThreshold": 100,
            "points": 10
          }
        }
      ]
    }
  },
  "leaderboards": {
    "daily_champions": {
      "id": "0040fe51-6bce-4b44-b0ad-bddc4e123535",
      "key": "daily_champions",
      "name": "Daily Champions",
      "description": null,
      "rankBy": "metric",
      "runUnit": null,
      "runInterval": 0,
      "maxParticipants": 100,
      "metricName": "Flashcards Flipped",
      "metricKey": "flashcards-flipped",
      "threshold": 10,
      "start": "2025-01-01",
      "end": null,
      "previousRank": 50,
      "rank": 12
    }
  }
}
```

This includes:

* The `achievements` array which is a list of newly unlocked achievements as a result of the event.
* The `currentStreak` object which is the users most up to date streak data after the event has taken place.

This makes it really easy for us to react to changes in the users progress and do whatever we want. In this example, each time Trophy tells us a user has unlocked a new achievement, or extended their streak we'll:

* Show a pop-up toast
* Play a sound effect

<h4 id="achievement-unlocked-toasts">
  Achievement Unlocked Toasts
</h4>

First, we'll show a toast when users unlock new achievements. For this we need to add the `sonner` component from shadcn/ui to our project:

```bash theme={null}
npx shadcn@latest add sonner
```

Then we'll create the `<Toast />` UI component we need to display toasts and a `toast()` utility function to trigger them:

```tsx src/lib/toast.tsx [expandable] theme={null}
"use client";

import React from "react";
import { toast as sonnerToast } from "sonner";
import Image from "next/image";

interface ToastProps {
  id: string | number;
  title: string;
  description?: string;
  image?: {
    src: string;
    alt: string;
  };
}

/**
 * A fully custom toast that still maintains the animations and interactions.
 * @param toast - The toast to display.
 * @returns The toast component.
 */
export function toast(toast: Omit<ToastProps, "id">) {
  return sonnerToast.custom((id) => (
    <Toast
      id={id}
      title={toast.title}
      description={toast.description}
      image={toast.image}
    />
  ));
}

/**
 * A fully custom toast that still maintains the animations and interactions.
 * @param props - The toast to display.
 * @returns The toast component.
 */
export function Toast(props: ToastProps) {
  const { title, description, image } = props;

  return (
    <div className="flex rounded-lg bg-white shadow-lg ring-1 ring-black/5 w-full md:max-w-[364px] items-center p-4">
      {image && (
        <div className="mr-4 flex-shrink-0">
          <Image
            src={image.src}
            alt={image.alt}
            width={40}
            height={40}
            className="rounded-md"
          />
        </div>
      )}
      <div className="flex flex-1 items-center">
        <div className="w-full">
          <p className="text-sm font-medium text-gray-900">{title}</p>
          {description && (
            <p className="mt-1 text-sm text-gray-500">{description}</p>
          )}
        </div>
      </div>
    </div>
  );
}
```

Next, we need to update the `page.tsx` file with the main `<Toaster />` component. This is the component from `sonner` which is responsible for displaying our toasts on the screen when we trigger them:

```tsx src/app/page.tsx {3,9} theme={null}
import { flashcards } from "@/data";
import Flashcards from "./flashcards";
import { Toaster } from "@/components/ui/sonner";

export default function Home() {
  return (
    <div className="flex flex-col items-center justify-center h-screen">
      <Flashcards flashcards={flashcards} />
      <Toaster />
    </div>
  );
}
```

Next, to make sure NextJS shows our badges, we need to configure Trophy's image host as a trusted domain. If you use custom badge URLs on your own domain or CDN, add those host names here too, or use a plain `<img>` and skip remote patterns.

```ts next.config.ts {4-11} theme={null}
import type { NextConfig } from "next";

const nextConfig: NextConfig = {
  images: {
    remotePatterns: [
      {
        protocol: "https",
        hostname: "lookmizerpsrsczvtlwh.supabase.co",
      },
    ],
  },
};

export default nextConfig;
```

And finally, we update our `<Flashcards />` component to read the response from Trophy and display toasts for any unlocked achievements:

```tsx src/app/flashcards.tsx [expandable] {15,33,38-56} theme={null}
"use client";

import {
  Carousel,
  CarouselContent,
  CarouselPrevious,
  CarouselNext,
  type CarouselApi,
} from "@/components/ui/carousel";
import { IFlashcard } from "@/types/flashcard";
import Flashcard from "./flashcard";
import { useEffect, useState } from "react";
import { Progress } from "@/components/ui/progress";
import { viewFlashcard } from "./actions";
import { toast } from "@/lib/toast";

interface Props {
  flashcards: IFlashcard[];
}

export default function Flashcards({ flashcards }: Props) {
  const [flashIndex, setFlashIndex] = useState(0);
  const [api, setApi] = useState<CarouselApi>();

  useEffect(() => {
    if (!api) {
      return;
    }

    // Initialize the flash index
    setFlashIndex(api.selectedScrollSnap() + 1);

    api.on("select", async () => {
      // Update flashIndex when the carousel is scrolled
      setFlashIndex(api.selectedScrollSnap() + 1);

      // Track the flashcard viewed event
      const response = await viewFlashcard();

      if (!response) {
        return;
      }

      // Show toasts if the user has unlocked any new achievements
      response.achievements.forEach((achievement) => {
        toast({
          title: achievement.name as string,
          description: achievement.description,
          image: {
            src: achievement.badgeUrl as string,
            alt: achievement.name as string,
          },
        });
      });
    });
  }, [api]);

  return (
    <div className="flex flex-col items-center justify-center gap-4 max-w-md">
      <Progress value={(flashIndex / flashcards.length) * 100} />
      <Carousel className="w-full" setApi={setApi}>
        <CarouselContent>
          {flashcards.map((flashcard) => (
            <Flashcard key={flashcard.id} flashcard={flashcard} />
          ))}
        </CarouselContent>
        <CarouselPrevious />
        <CarouselNext />
      </Carousel>
    </div>
  );
}
```

To see this in action, all we need to do is unlock our first achievement by viewing 10 flashcards:

<Frame>
  <video autoPlay muted loop playsInline className="w-full aspect-video" src="https://mintcdn.com/trophy/TwFTsrgzoQZ8iwx1/assets/guides/example-apps/example-study-app/displaying-toasts.mp4?fit=max&auto=format&n=TwFTsrgzoQZ8iwx1&q=85&s=60c160aef27ad712f1c5249a9e9b3099" data-path="assets/guides/example-apps/example-study-app/displaying-toasts.mp4" />
</Frame>

<h4 id="streak-extended-toasts">
  Streak Extended Toasts
</h4>

We'll use the same methods to show similar toasts when a user extends their streak. As we've set up a daily streak in Trophy, this will trigger the first time a user views a flashcard each day.

<Tip>
  If we wanted to experiment with a different streak cadence, like a weekly
  streak, then none of this code changes - the great thing about Trophy is
  everything can be configured from within the dashboard and doesn't require any
  code changes.
</Tip>

All we need to do is read the `currentStreak.extended` property from Trophy and handle showing another toast with a new `if` statement:

```tsx src/app/flashcards.tsx [expandable] {56-63} theme={null}
"use client";

import {
  Carousel,
  CarouselContent,
  CarouselPrevious,
  CarouselNext,
  type CarouselApi,
} from "@/components/ui/carousel";
import { IFlashcard } from "@/types/flashcard";
import Flashcard from "./flashcard";
import { useEffect, useState } from "react";
import { Progress } from "@/components/ui/progress";
import { viewFlashcard } from "./actions";
import { toast } from "@/lib/toast";

interface Props {
  flashcards: IFlashcard[];
}

export default function Flashcards({ flashcards }: Props) {
  const [flashIndex, setFlashIndex] = useState(0);
  const [api, setApi] = useState<CarouselApi>();

  useEffect(() => {
    if (!api) {
      return;
    }

    // Initialize the flash index
    setFlashIndex(api.selectedScrollSnap() + 1);

    api.on("select", async () => {
      // Update flashIndex when the carousel is scrolled
      setFlashIndex(api.selectedScrollSnap() + 1);

      // Track the flashcard viewed event
      const response = await viewFlashcard();

      if (!response) {
        return;
      }

      // Show toasts if the user has unlocked any new achievements
      response.achievements.forEach((achievement) => {
        toast({
          title: achievement.name as string,
          description: achievement.description,
          image: {
            src: achievement.badgeUrl as string,
            alt: achievement.name as string,
          },
        });
      });

      // Show toast if user has extended their streak
      if (response.currentStreak?.extended) {
        toast({
          title: "You're on a roll!",
          description: `Keep going to keep your ${response.currentStreak.length} day streak!`,
        });
      }
    });
  }, [api]);

  return (
    <div className="flex flex-col items-center justify-center gap-4 max-w-md">
      <Progress value={(flashIndex / flashcards.length) * 100} />
      <Carousel className="w-full" setApi={setApi}>
        <CarouselContent>
          {flashcards.map((flashcard) => (
            <Flashcard key={flashcard.id} flashcard={flashcard} />
          ))}
        </CarouselContent>
        <CarouselPrevious />
        <CarouselNext />
      </Carousel>
    </div>
  );
}
```

Now the first time a user views a flashcard each day, they'll see one of our streak extended toasts:

<Frame>
  <video autoPlay muted loop playsInline className="w-full aspect-video" src="https://mintcdn.com/trophy/TwFTsrgzoQZ8iwx1/assets/guides/example-apps/example-study-app/streak-toasts.mp4?fit=max&auto=format&n=TwFTsrgzoQZ8iwx1&q=85&s=ed1c3b678db7a14624d07f131b48d884" data-path="assets/guides/example-apps/example-study-app/streak-toasts.mp4" />
</Frame>

<h4 id="sound-effects">
  Sound Effects
</h4>

Gamification is first and foremost about increasing user retention. The best way to do this is to make the features we build as engaging as possible. A great way to do this that's often overlooked is with sound effects.

Here we'll add two distinct sound effects for each case where we show a toast to further engage the user. This helps distinguish the different toasts and helps users build up an expectation of what each sound means.

For this we'll make use of the [HTML5 Audio API](https://developer.mozilla.org/en-US/docs/Web/API/Web_Audio_API) and use sounds from [freesounds.org](https://freesounds.org).

<Tip>
  The sounds used in this example are in the repository in the `public/sounds`
  directory. Feel free to use them or pick others you like!
</Tip>

To load the sound files into our application, we'll create a ref for each one, then we simply call the `play()` method on each when we want to actually play the sound:

```tsx src/app/flashcards.tsx [expandable] {25-31,53-57,73-77} theme={null}
"use client";

import {
  Carousel,
  CarouselContent,
  CarouselPrevious,
  CarouselNext,
  type CarouselApi,
} from "@/components/ui/carousel";
import { IFlashcard } from "@/types/flashcard";
import Flashcard from "./flashcard";
import { useEffect, useState, useRef } from "react";
import { Progress } from "@/components/ui/progress";
import { viewFlashcard } from "./actions";
import { toast } from "@/lib/toast";

interface Props {
  flashcards: IFlashcard[];
}

export default function Flashcards({ flashcards }: Props) {
  const [flashIndex, setFlashIndex] = useState(0);
  const [api, setApi] = useState<CarouselApi>();

  const achievementSound = useRef<HTMLAudioElement | null>(null);
  const streakSound = useRef<HTMLAudioElement | null>(null);

  useEffect(() => {
    achievementSound.current = new Audio("/sounds/achievement_unlocked.mp3");
    streakSound.current = new Audio("/sounds/streak_extended.mp3");
  }, []);

  useEffect(() => {
    if (!api) {
      return;
    }

    // Initialize the flash index
    setFlashIndex(api.selectedScrollSnap() + 1);

    api.on("select", async () => {
      // Update flashIndex when the carousel is scrolled
      setFlashIndex(api.selectedScrollSnap() + 1);

      // Track the flashcard viewed event
      const response = await viewFlashcard();

      if (!response) {
        return;
      }

      if (response.achievements?.length) {
        // Play the achievement sound only once for all new achievements
        if (achievementSound.current) {
          achievementSound.current.currentTime = 0;
          achievementSound.current.play();
        }

        // Show toasts if the user has unlocked any new achievements
        response.achievements.forEach((achievement) => {
          toast({
            title: achievement.name as string,
            description: achievement.description,
            image: {
              src: achievement.badgeUrl as string,
              alt: achievement.name as string,
            },
          });
        });
      }

      if (response.currentStreak?.extended) {
        // Play the streak sound
        if (streakSound.current) {
          streakSound.current.currentTime = 0;
          streakSound.current.play();
        }

        // Show toast if the user has extended their streak
        toast({
          title: "You're on a roll!",
          description: `Keep going to keep your ${response.currentStreak.length} day streak!`,
        });
      }
    });
  }, [api]);

  return (
    <div className="flex flex-col items-center justify-center gap-4 max-w-md">
      <Progress value={(flashIndex / flashcards.length) * 100} />
      <Carousel className="w-full" setApi={setApi}>
        <CarouselContent>
          {flashcards.map((flashcard) => (
            <Flashcard key={flashcard.id} flashcard={flashcard} />
          ))}
        </CarouselContent>
        <CarouselPrevious />
        <CarouselNext />
      </Carousel>
    </div>
  );
}
```

<h4 id="displaying-study-journey">
  Displaying Study Journey
</h4>

The last piece of UI we'll add will be a dialog to display the user's study progress, including their streak and any achievements they've unlocked so far.

First, we'll add a couple of new server actions to fetch the users streak and achievements from Trophy. As we're using a daily streak here, we'll fetch the last 14 days of streak data from Trophy to give us enough to work with in our UI:

```tsx src/app/actions.ts [expandable] {6-7,10-11,24,33,45-58,60-73} theme={null}
"use server";

import { TrophyApiClient } from "@trophyso/node";
import {
  EventResponse,
  MultiStageAchievementResponse,
  StreakResponse,
} from "@trophyso/node/api";

const USER_ID = "39";
const FLASHCARDS_VIEWED_METRIC_KEY = "flashcards-flipped";

// Set up Trophy SDK with API key
const trophy = new TrophyApiClient({
  apiKey: process.env.TROPHY_API_KEY as string,
});

/**
 * Track a flashcard viewed event in Trophy
 * @returns The event response from Trophy
 */
export async function viewFlashcard(): Promise<EventResponse | null> {
  try {
    return await trophy.metrics.event(FLASHCARDS_VIEWED_METRIC_KEY, {
      user: {
        // Mock email
        email: "user@example.com",

        // Mock timezone
        tz: "Europe/London",

        // Mock user ID
        id: USER_ID,
      },

      // Event represents a single user viewing 1 flashcard
      value: 1,
    });
  } catch (error) {
    console.error(error);
    return null;
  }
}

/**
 * Get the achievements for a user
 * @returns The achievements for the user
 */
export async function getAchievements(): Promise<
  MultiStageAchievementResponse[] | null
> {
  try {
    return await trophy.users.allachievements(USER_ID);
  } catch (error) {
    console.error(error);
    return null;
  }
}

/**
 * Get the streak for a user
 * @returns The streak for the user
 */
export async function getStreak(): Promise<StreakResponse | null> {
  try {
    return await trophy.users.streak(USER_ID, {
      historyPeriods: 14,
    });
  } catch (error) {
    console.error(error);
    return null;
  }
}
```

Then we'll call these actions on the server when the page is requested:

```tsx src/app/page.tsx {7-8} theme={null}
import { flashcards } from "@/data";
import Flashcards from "./flashcards";
import { Toaster } from "@/components/ui/sonner";
import { getAchievements, getStreak } from "./actions";

export default async function Home() {
  const achievements = await getAchievements();
  const streak = await getStreak();

  return (
    <div className="flex flex-col items-center justify-center h-screen relative">
      <Flashcards flashcards={flashcards} />
      <Toaster />
    </div>
  );
}
```

Then we'll create a new `<StudyJourney />` component that takes in the achievements and streak data as props and renders it nicely in a dialog. Before adding this we need to add the shadcn/ui `dialog` component to our project, and while we're at it, we'll add the `seperator` component too:

```bash theme={null}
npx shadcn@latest add dialog separator
```

We'll also need `dayjs` to help us with displaying dates nicely as well:

```bash theme={null}
npm i dayjs
```

Now we have everything we need to build our study journey component:

```tsx src/app/study-journey.tsx [expandable] theme={null}
import { Separator } from "@/components/ui/separator";
import {
  MultiStageAchievementResponse,
  StreakResponse,
} from "@trophyso/node/api";
import { Flame, GraduationCap } from "lucide-react";
import Image from "next/image";
import dayjs from "dayjs";
import {
  Dialog,
  DialogTrigger,
  DialogContent,
  DialogHeader,
  DialogTitle,
  DialogDescription,
} from "@/components/ui/dialog";

interface Props {
  achievements: MultiStageAchievementResponse[] | null;
  streak: StreakResponse | null;
}

export default function StudyJourney({ achievements, streak }: Props) {
  const sundayOffset = 7 - ((new Date().getDay() + 6) % 7);

  const adjustedStreakHistory =
    streak?.streakHistory?.slice(
      sundayOffset - 1,
      streak.streakHistory.length,
    ) || Array(14).fill(null);

  return (
    <div className="absolute top-10 right-10 z-50 cursor-pointer">
      <Dialog>
        <DialogTrigger>
          <div className="h-12 w-12 cursor-pointer duration-100 border-1 border-gray-300 shadow-sm transition-all rounded-full relative hover:bg-gray-100">
            <GraduationCap className="h-6 w-6 absolute top-1/2 left-1/2 -translate-x-1/2 -translate-y-1/2 text-gray-800" />
          </div>
        </DialogTrigger>
        <DialogContent className="flex flex-col gap-3 min-w-[500px]">
          {/* Heading */}
          <DialogHeader>
            <DialogTitle>Your study journey</DialogTitle>
            <DialogDescription>
              Keep studying to extend your streak and earn new badges
            </DialogDescription>
          </DialogHeader>

          {/* Streak */}
          <div className="flex flex-col gap-2 items-center justify-between pt-2">
            <div className="flex flex-col items-center gap-4">
              <div className="relative h-24 w-24">
                <svg className="h-full w-full" viewBox="0 0 100 100">
                  <circle
                    className="stroke-primary/20"
                    strokeWidth="10"
                    fill="transparent"
                    r="45"
                    cx="50"
                    cy="50"
                  />
                  <circle
                    className="stroke-primary transition-all"
                    strokeWidth="10"
                    strokeLinecap="round"
                    fill="transparent"
                    r="45"
                    cx="50"
                    cy="50"
                    strokeDasharray={`${(streak?.length || 0) * 10} 1000`}
                    transform="rotate(-90 50 50)"
                  />
                </svg>
                <div className="absolute inset-0 flex items-center justify-center">
                  <span className="text-2xl font-bold text-primary">
                    {streak?.length || 0}
                  </span>
                </div>
              </div>
              <div className="flex flex-col text-center">
                <h3 className="text-lg font-semibold">
                  {streak && streak.length > 0
                    ? `Your study streak`
                    : `No study streak`}
                </h3>
                <p className="text-sm text-gray-500">
                  {streak && streak.length > 0
                    ? `${streak.length} day${
                        streak.length > 1 ? "s" : ""
                      } in a row`
                    : `Start a streak`}
                </p>
              </div>
            </div>
            <div className="flex flex-col">
              <div className="grid grid-cols-7 gap-1">
                {["M", "T", "W", "T", "F", "S", "S"].map((day, i) => (
                  <div
                    key={i}
                    className="h-10 flex items-center justify-center"
                  >
                    <span className="text-sm text-gray-500">{day}</span>
                  </div>
                ))}
              </div>
              <div className="grid grid-cols-7 gap-1">
                {adjustedStreakHistory.map((day, i) => {
                  if (day === null) {
                    return (
                      <div
                        key={i}
                        className="h-10 w-10 rounded-lg bg-white border border-gray-200 flex items-center justify-center"
                      >
                        <Flame className="h-6 w-6 text-gray-200" />
                      </div>
                    );
                  }

                  return (
                    <div
                      key={i}
                      className={`h-10 w-10 rounded-lg ${
                        day.length > 0 ? "bg-primary" : "bg-primary/10"
                      } flex items-center justify-center`}
                    >
                      <Flame
                        className={`h-6 w-6 ${
                          day.length > 0 ? "text-white" : "text-primary/30"
                        }`}
                      />
                    </div>
                  );
                })}
              </div>
            </div>
          </div>

          <Separator />

          {/* Achievements */}
          {achievements && achievements.length > 0 ? (
            <div className="flex flex-col gap-3">
              <div>
                <p className="text-lg font-semibold">Your badges</p>
              </div>
              <div className="grid grid-cols-3 gap-2 w-full">
                {achievements?.map((achievement) => (
                  <div
                    key={achievement.id}
                    className="p-2 rounded-md border border-gray-200 flex flex-col gap-1 items-center shadow-sm"
                  >
                    <Image
                      src={achievement.badgeUrl as string}
                      alt={achievement.name as string}
                      width={100}
                      height={100}
                      className="rounded-full border-gray-300"
                    />
                    <p className="font-semibold">{achievement.name}</p>
                    <p className="text-gray-500 text-sm">
                      {dayjs(achievement.achievedAt).format("MMM D, YYYY")}
                    </p>
                  </div>
                ))}
              </div>
            </div>
          ) : (
            <div className="flex flex-col gap-1 items-center justify-center min-h-[100px] p-3 w-full mt-3">
              <p className="font-semibold text-lg">No badges yet</p>
              <p className="text-sm text-gray-500 text-center max-w-[200px]">
                Keep studying to unlock more badges!
              </p>
            </div>
          )}
        </DialogContent>
      </Dialog>
    </div>
  );
}
```

Finally, we simply add this component to our page and we should be good to go:

```tsx src/app/page.tsx {4,13} theme={null}
import { flashcards } from "@/data";
import Flashcards from "./flashcards";
import { Toaster } from "@/components/ui/sonner";
import StudyJourney from "./study-journey";
import { getAchievements, getStreak } from "./actions";

export default async function Home() {
  const achievements = await getAchievements();
  const streak = await getStreak();

  return (
    <div className="flex flex-col items-center justify-center h-screen relative">
      <StudyJourney achievements={achievements} streak={streak} />
      <Flashcards flashcards={flashcards} />
      <Toaster />
    </div>
  );
}
```

<Frame>
  <video autoPlay muted loop playsInline className="w-full aspect-video" src="https://mintcdn.com/trophy/TwFTsrgzoQZ8iwx1/assets/guides/example-apps/example-study-app/study-journey.mp4?fit=max&auto=format&n=TwFTsrgzoQZ8iwx1&q=85&s=ee88d1f451d360d8fa94b9f0003f3c05" data-path="assets/guides/example-apps/example-study-app/study-journey.mp4" />
</Frame>

<h2 id="adding-an-xp-system">
  Adding an XP System
</h2>

Now let's take our study platform to the next level by adding an XP (points) system. This will give users a sense of progression and reward them for their study activity.

<h3 id="setting-up-points-in-trophy">
  Setting Up Points in Trophy
</h3>

First, head to the Trophy [points page](https://app.trophy.so/points) and create a new points system. We'll call ours "XP" with the key `points`.

<Frame>
  <video autoPlay muted loop playsInline className="w-full aspect-video" src="https://mintcdn.com/trophy/pT3Z8wUYz-WsIrqf/assets/guides/example-apps/example-study-app/configure-points.mp4?fit=max&auto=format&n=pT3Z8wUYz-WsIrqf&q=85&s=5e7c59233806cf9a381de048246a7c2d" data-path="assets/guides/example-apps/example-study-app/configure-points.mp4" />
</Frame>

Configure your points system to award XP for viewing flashcards. You can also set up bonus XP for streak milestones.

<h3 id="integrating-points-api">
  Integrating Points API
</h3>

Add new server actions to fetch points data:

```tsx src/app/actions.ts [expandable] theme={null}
const POINTS_SYSTEM_KEY = "points";

/**
 * Get the points system configuration
 */
export async function getPointsSystem(): Promise<PointsSystemResponse | null> {
  try {
    return await trophy.points.system(POINTS_SYSTEM_KEY);
  } catch (error) {
    console.error(error);
    return null;
  }
}

/**
 * Get the points for a user
 */
export async function getUserPoints(
  userId: string,
): Promise<GetUserPointsResponse | null> {
  try {
    return await trophy.users.points(userId, POINTS_SYSTEM_KEY, {
      awards: 5,
    });
  } catch (error) {
    console.error(error);
    return null;
  }
}

/**
 * Get the points history summary for a user
 */
export async function getPointsSummary(
  userId: string,
): Promise<UsersPointsEventSummaryResponseItem[] | null> {
  try {
    const now = dayjs();
    return await trophy.users.pointsEventSummary(userId, POINTS_SYSTEM_KEY, {
      aggregation: "daily",
      startDate: now.subtract(6, "day").toISOString().split("T")[0],
      endDate: now.toISOString().split("T")[0],
    });
  } catch (error) {
    console.error(error);
    return null;
  }
}
```

<h3 id="creating-a-points-context">
  Creating a Points Context
</h3>

To manage points state across the app, create a React context:

```tsx src/contexts/UserPointsContext.tsx [expandable] theme={null}
"use client";

import {
  createContext,
  useContext,
  useEffect,
  useState,
  ReactNode,
  useCallback,
  useRef,
} from "react";
import { GetUserPointsResponse } from "@trophyso/node/api";
import { getUserPoints } from "@/app/actions";
import { getUserId } from "@/lib/user";

interface UserPointsContextType {
  points: GetUserPointsResponse | null;
  lastPoints: GetUserPointsResponse | null;
  loading: boolean;
  error: string | null;
  refetch: () => Promise<void>;
}

const UserPointsContext = createContext<UserPointsContextType | undefined>(
  undefined,
);

export function UserPointsProvider({ children }: { children: ReactNode }) {
  const [points, setPoints] = useState<GetUserPointsResponse | null>(null);
  const [lastPoints, setLastPoints] = useState<GetUserPointsResponse | null>(
    null,
  );
  const [loading, setLoading] = useState(false);
  const [error, setError] = useState<string | null>(null);
  const timeoutRef = useRef<NodeJS.Timeout | null>(null);

  const fetchPoints = async () => {
    const userId = getUserId();
    setLoading(true);
    setError(null);

    try {
      setLastPoints(points);
      const pointsData = await getUserPoints(userId);
      setPoints(pointsData);
    } catch (err) {
      setError(err instanceof Error ? err.message : "Failed to fetch points");
    } finally {
      setLoading(false);
    }
  };

  const refetch = useCallback(async () => {
    if (timeoutRef.current) {
      clearTimeout(timeoutRef.current);
    }
    timeoutRef.current = setTimeout(() => {
      fetchPoints();
    }, 300);
  }, []);

  useEffect(() => {
    fetchPoints();
    return () => {
      if (timeoutRef.current) {
        clearTimeout(timeoutRef.current);
      }
    };
  }, []);

  return (
    <UserPointsContext.Provider
      value={{ points, lastPoints, loading, error, refetch }}
    >
      {children}
    </UserPointsContext.Provider>
  );
}

export function useUserPoints() {
  const context = useContext(UserPointsContext);
  if (context === undefined) {
    throw new Error("useUserPoints must be used within a UserPointsProvider");
  }
  return context;
}
```

<h3 id="building-the-points-center-ui">
  Building the Points Center UI
</h3>

Create a points display component that shows the user's XP with a satisfying number animation:

```tsx src/app/user-center/points-center/points-center.tsx [expandable] theme={null}
import {
  Dialog,
  DialogTrigger,
  DialogContent,
  DialogHeader,
  DialogTitle,
  DialogDescription,
} from "@/components/ui/dialog";
import { useUserPoints } from "@/contexts/UserPointsContext";
import { useEffect, useState } from "react";
import { Sparkle } from "lucide-react";
import { NumberTicker } from "@/components/magicui/number-ticker";

export default function PointsCenter() {
  const [open, setOpen] = useState(false);
  const { points, lastPoints, loading } = useUserPoints();
  const [isSpinning, setIsSpinning] = useState(false);

  // Trigger spinning animation when points change
  useEffect(() => {
    if (points?.total !== lastPoints?.total && points?.total !== undefined) {
      setIsSpinning(true);
      const timer = setTimeout(() => setIsSpinning(false), 1000);
      return () => clearTimeout(timer);
    }
  }, [points?.total, lastPoints?.total]);

  return (
    <Dialog open={open} onOpenChange={setOpen}>
      <DialogTrigger>
        <div className="relative rounded-full h-10 border cursor-pointer">
          <div className="rounded-full bg-gray-50 text-sm font-semibold h-full flex items-center gap-1 px-3">
            <Sparkle className={`size-4 ${isSpinning ? "animate-spin" : ""}`} />
            <NumberTicker
              value={points?.total || 0}
              startValue={lastPoints?.total || 0}
              duration={0.1}
            />
          </div>
        </div>
      </DialogTrigger>
      <DialogContent>
        <DialogHeader>
          <DialogTitle>
            <div className="flex items-center gap-1">
              <Sparkle className="size-4" />
              Your XP
            </div>
          </DialogTitle>
          <DialogDescription>Keep studying to earn more XP</DialogDescription>
        </DialogHeader>
        {/* Add points history chart, recent awards, etc. */}
      </DialogContent>
    </Dialog>
  );
}
```

<h3 id="updating-points-on-flashcard-view">
  Updating Points on Flashcard View
</h3>

Finally, re-fetch points whenever a user views a flashcard to show real-time XP updates:

```tsx src/app/flashcards.tsx {4,8,45} theme={null}
import { useUserPoints } from "@/contexts/UserPointsContext";

export default function Flashcards({ flashcards }: Props) {
  const { refetch: refetchPoints } = useUserPoints();

  // ... existing code ...

  api.on("select", async () => {
    setFlashIndex(api.selectedScrollSnap() + 1);

    const response = await viewFlashcard();

    if (!response) return;

    // Refetch points to update the XP display
    refetchPoints();

    // ... handle achievements and streaks ...
  });
}
```

Now when users view flashcards, they'll see their XP update in real-time with a satisfying animation!

<Frame>
  <video autoPlay muted loop playsInline className="w-full aspect-video" src="https://mintcdn.com/trophy/pT3Z8wUYz-WsIrqf/assets/guides/example-apps/example-study-app/points-animation.mp4?fit=max&auto=format&n=pT3Z8wUYz-WsIrqf&q=85&s=1bfc01f8ade30e142a9b9368b148501b" data-path="assets/guides/example-apps/example-study-app/points-animation.mp4" />
</Frame>

<h2 id="adding-leaderboards">
  Adding Leaderboards
</h2>

Nothing drives engagement like friendly competition. Let's add a leaderboard to show how users stack up against each other.

<h3 id="setting-up-leaderboards-in-trophy">
  Setting Up Leaderboards in Trophy
</h3>

Head to the Trophy [leaderboards page](https://app.trophy.so/leaderboards) and create a new leaderboard. We'll create a daily leaderboard with the key `daily-champions` that ranks users by flashcards viewed.

<Frame>
  <video autoPlay muted loop playsInline className="w-full aspect-video" src="https://mintcdn.com/trophy/pT3Z8wUYz-WsIrqf/assets/guides/example-apps/example-study-app/configure-leaderboard.mp4?fit=max&auto=format&n=pT3Z8wUYz-WsIrqf&q=85&s=2620226cbdd8251cd82070427629040d" data-path="assets/guides/example-apps/example-study-app/configure-leaderboard.mp4" />
</Frame>

<h3 id="leaderboard-api-integration">
  Leaderboard API Integration
</h3>

Add server actions for fetching leaderboard data:

```tsx src/app/actions.ts [expandable] theme={null}
const LEADERBOARD_KEY = "daily-champions";

/**
 * Get the leaderboard rankings
 */
export async function getLeaderboard(
  limit?: number,
  offset?: number,
  userId?: string,
  runDate?: string,
): Promise<LeaderboardResponseWithRankings | null> {
  try {
    return await trophy.leaderboards.get(LEADERBOARD_KEY, {
      limit: limit || 10,
      offset: offset || 0,
      userId: userId || undefined,
      run: runDate || undefined,
    });
  } catch (error) {
    console.error("Get leaderboard error:", error);
    return null;
  }
}

/**
 * Get a specific user's leaderboard position and history
 */
export async function getUserLeaderboard(
  userId: string,
  run?: string,
): Promise<UserLeaderboardResponseWithHistory | null> {
  try {
    return await trophy.users.leaderboard(userId, LEADERBOARD_KEY, {
      run,
    });
  } catch (error) {
    console.error("Get user leaderboard error:", error);
    return null;
  }
}
```

<h3 id="building-the-leaderboard-ui">
  Building the Leaderboard UI
</h3>

Create a leaderboard component that displays rankings with pagination:

```tsx src/app/leaderboard-center/leaderboard-center.tsx [expandable] theme={null}
import {
  Dialog,
  DialogTrigger,
  DialogContent,
  DialogHeader,
  DialogTitle,
} from "@/components/ui/dialog";
import { useState, useEffect } from "react";
import { getLeaderboard } from "@/app/actions";
import { LeaderboardResponseWithRankings } from "@trophyso/node/api";

export default function LeaderboardCenter() {
  const [open, setOpen] = useState(false);
  const [leaderboard, setLeaderboard] =
    useState<LeaderboardResponseWithRankings | null>(null);

  useEffect(() => {
    if (open) {
      getLeaderboard(10, 0).then(setLeaderboard);
    }
  }, [open]);

  return (
    <Dialog open={open} onOpenChange={setOpen}>
      <DialogTrigger>
        <button className="flex items-center gap-2 px-4 py-2 rounded-lg border">
          🏆 Leaderboard
        </button>
      </DialogTrigger>
      <DialogContent>
        <DialogHeader>
          <DialogTitle>Daily Champions</DialogTitle>
        </DialogHeader>
        <div className="space-y-2">
          {leaderboard?.rankings?.map((entry, index) => (
            <div
              key={entry.userId}
              className="flex items-center justify-between p-3 rounded-lg bg-gray-50"
            >
              <div className="flex items-center gap-3">
                <span className="font-bold text-lg">#{index + 1}</span>
                <span>{entry.userId}</span>
              </div>
              <span className="font-semibold">{entry.score} cards</span>
            </div>
          ))}
        </div>
      </DialogContent>
    </Dialog>
  );
}
```

The leaderboard automatically updates as users study, creating a dynamic competitive environment that encourages daily engagement.

<h2 id="adding-an-energy-system">
  Adding an Energy System
</h2>

Energy (or "lives") systems are a proven retention mechanic that encourages users to return throughout the day. Let's add one to our study platform.

<h3 id="setting-up-energy-in-trophy">
  Setting Up Energy in Trophy
</h3>

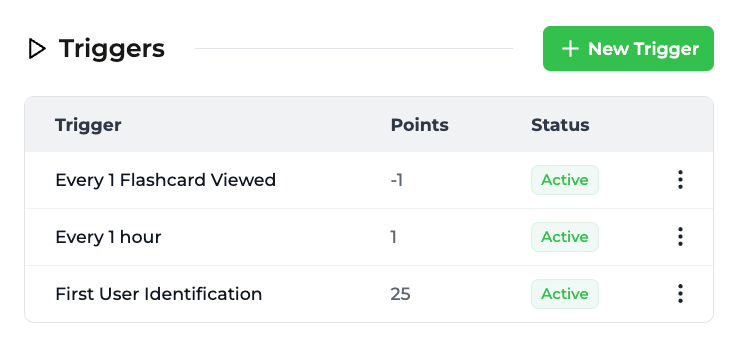
Trophy's points system is flexible enough to handle energy mechanics. Create a new points system with the key `energy` and configure it with:

* A maximum cap (e.g., 5 energy)
* Automatic regeneration rules
* Costs per action (e.g., -1 energy per flashcard session)
<Frame>
  <img height="200" width="100%" noZoom src="https://mintcdn.com/trophy/pT3Z8wUYz-WsIrqf/assets/guides/example-apps/example-study-app/energy-triggers.png?fit=max&auto=format&n=pT3Z8wUYz-WsIrqf&q=85&s=2c2b4d67f7f51e7d5f0416487b043e06" data-path="assets/guides/example-apps/example-study-app/energy-triggers.png" />
</Frame>

<h3 id="energy-api-integration">
  Energy API Integration
</h3>

Add server actions for energy management:

```tsx src/app/actions.ts [expandable] theme={null}
const ENERGY_SYSTEM_KEY = "energy";

/**
 * Get the energy system configuration
 */
export async function getEnergySystem(): Promise<PointsSystemResponse | null> {
  try {
    return await trophy.points.system(ENERGY_SYSTEM_KEY);
  } catch (error) {
    console.error("Get energy system error:", error);
    return null;
  }
}

/**
 * Get the current energy for a user
 */
export async function getUserEnergy(
  userId: string,
): Promise<GetUserPointsResponse | null> {
  try {
    return await trophy.users.points(userId, ENERGY_SYSTEM_KEY, {
      awards: 5,
    });
  } catch (error) {
    console.error("Get user energy error:", error);
    return null;
  }
}
```

<h3 id="creating-an-energy-context">
  Creating an Energy Context
</h3>

Similar to points, create a context for managing energy state:

```tsx src/contexts/UserEnergyContext.tsx [expandable] theme={null}
"use client";

import {
  createContext,
  useContext,
  useEffect,
  useState,
  ReactNode,
  useCallback,
} from "react";
import { GetUserPointsResponse } from "@trophyso/node/api";
import { getUserEnergy } from "@/app/actions";
import { getUserId } from "@/lib/user";

interface UserEnergyContextType {
  energy: GetUserPointsResponse | null;
  loading: boolean;
  refetch: () => Promise<void>;
}

const UserEnergyContext = createContext<UserEnergyContextType | undefined>(
  undefined,
);

export function UserEnergyProvider({ children }: { children: ReactNode }) {
  const [energy, setEnergy] = useState<GetUserPointsResponse | null>(null);
  const [loading, setLoading] = useState(false);

  const fetchEnergy = async () => {
    const userId = getUserId();
    setLoading(true);
    try {
      const energyData = await getUserEnergy(userId);
      setEnergy(energyData);
    } finally {
      setLoading(false);
    }
  };

  const refetch = useCallback(async () => {
    await fetchEnergy();
  }, []);

  useEffect(() => {
    fetchEnergy();
  }, []);

  return (
    <UserEnergyContext.Provider value={{ energy, loading, refetch }}>
      {children}
    </UserEnergyContext.Provider>
  );
}

export function useUserEnergy() {
  const context = useContext(UserEnergyContext);
  if (context === undefined) {
    throw new Error("useUserEnergy must be used within a UserEnergyProvider");
  }
  return context;
}
```

<h3 id="building-the-energy-ui">
  Building the Energy UI
</h3>

Create an energy display that shows remaining energy with visual indicators:

```tsx src/app/energy-center/energy-center.tsx [expandable] theme={null}
import { useUserEnergy } from "@/contexts/UserEnergyContext";
import { Zap } from "lucide-react";

export default function EnergyCenter() {
  const { energy, loading } = useUserEnergy();
  const maxEnergy = 5;
  const currentEnergy = energy?.total || 0;

  return (
    <div className="flex items-center gap-1 px-3 py-2 rounded-lg border">
      {Array.from({ length: maxEnergy }).map((_, i) => (
        <Zap
          key={i}
          className={`size-5 ${i < currentEnergy ? "text-yellow-500 fill-yellow-500" : "text-gray-300"}`}
        />
      ))}
    </div>
  );
}
```

With energy in place, users have a reason to return multiple times throughout the day as their energy regenerates, boosting your daily active users.

<h2 id="the-result">
  The Result
</h2>

Congrats! If you're reading this you made it to the end of the tutorial and built yourself a fully-functioning study platform. Of course there's loads more we could do to this, so here's a few ideas:

* Persist flashcards to a database
* Create multiple flashcard sets for other topics
* Add authentication
* Allow users to create their own flashcard sets

<Tip>
  If you had fun or think you learned something along the way then give the repo
  a star on [GitHub](https://github.com/trophyso/example-study-platform)!
</Tip>

<h2 id="get-support">
  Get Support
</h2>

Want to get in touch with the Trophy team? Reach out to us via [email](mailto:support@trophy.so). We're here to help!
